I knew these biscuits were good when my wife who was a vegetarian most of her life had me make them on a weekly basis. She also shared one with her boss at work and a couple of her friends. I’ve had no fewer than 5 of her girlfriends ask me for the recipe. So I decided to share the deliciousness on my blog for anyone to make and enjoy.
The ingredients are pretty simple. The secret ingredient is cottage cheese. They bring 28 grams of protein and I’m sure they are what make them moist and not hard and dry like most gluten free baked goods.
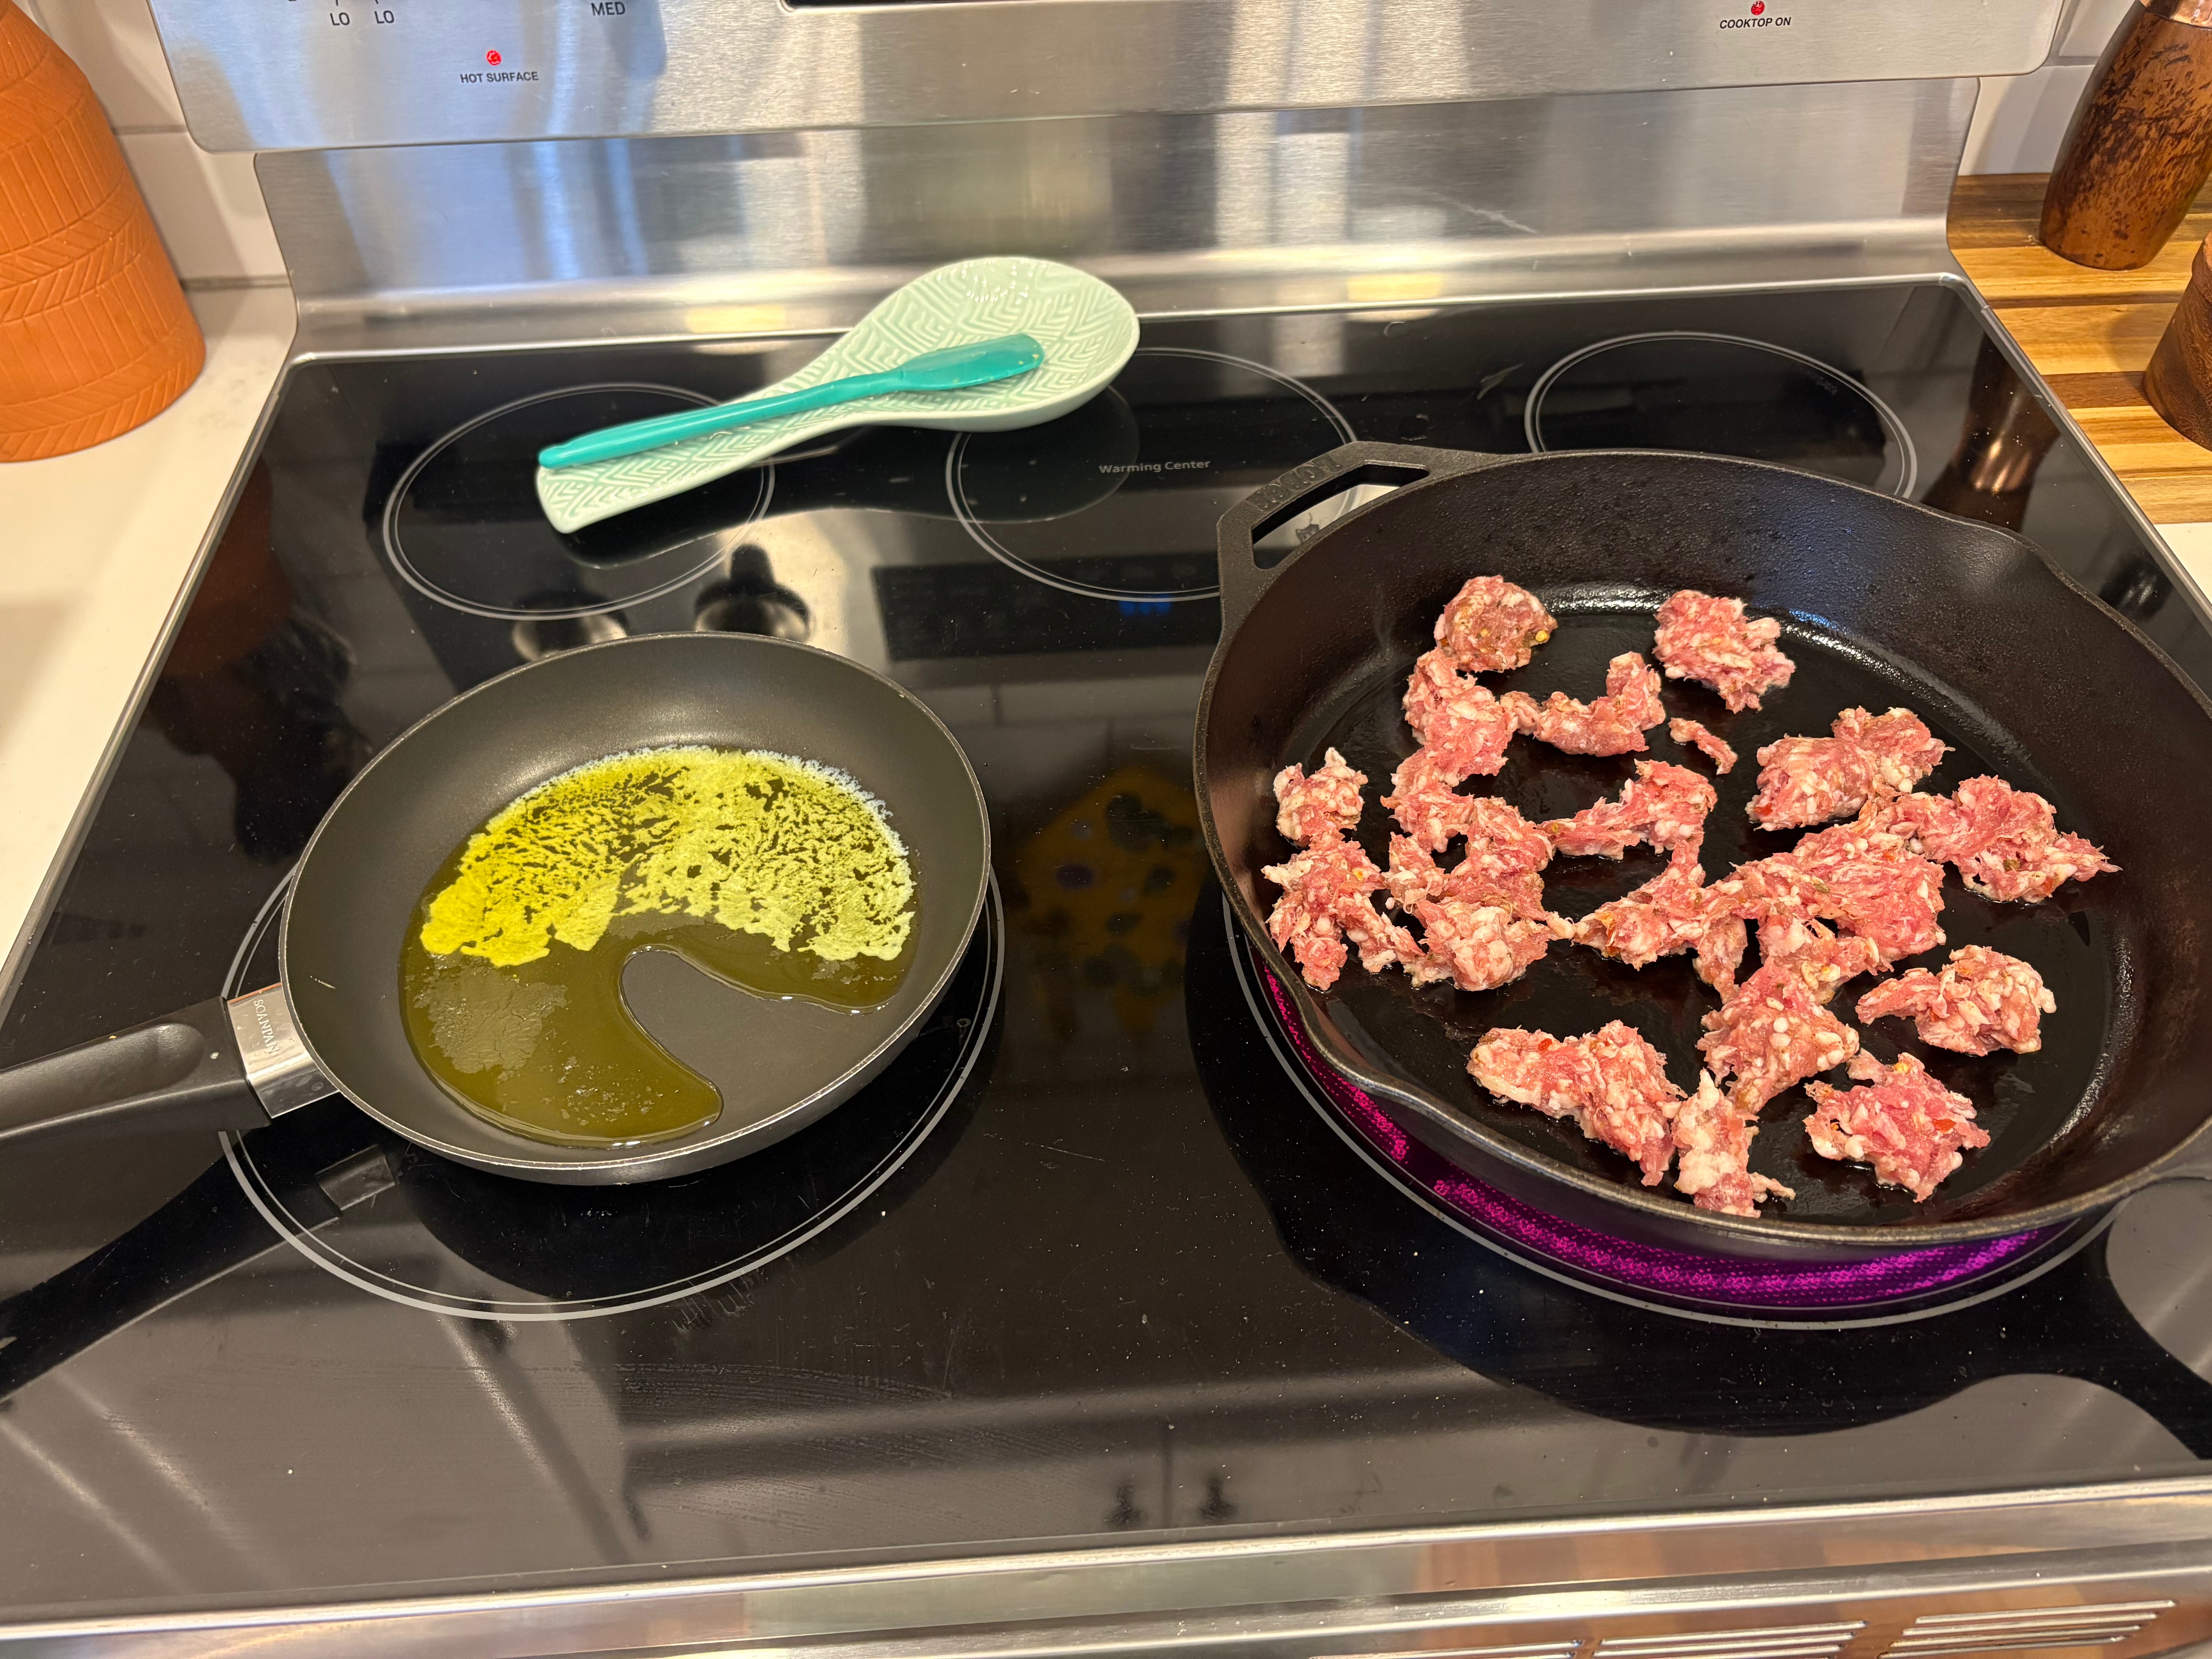
We get crumbled country sausage from the meat store (Light Hill Meats). It’s our local butcher and the boys call it the meat store. They have a local farm where their cows, pigs and chickens roam freely and are mindfully raised. Both my tastebuds and Soul can tell a difference.
One time I was being “cheap” and bought some baby back ribs that were less expensive at Whole Foods. I was like, let’s see if anyone can taste a difference. I prepared them the exact same way that I always do. I could taste the difference. Without even asking them, Matteo and Owen both said, “why aren’t these as good as usual”. I explained to them why and they said, let’s only buy meat from the meat store from now on. So now that’s what I do. It’s a little more expensive, but it tastes better and is better for us. Not to mention it helps the environment and local economy in a small way. So it’s well worth the extra money in my opinion.
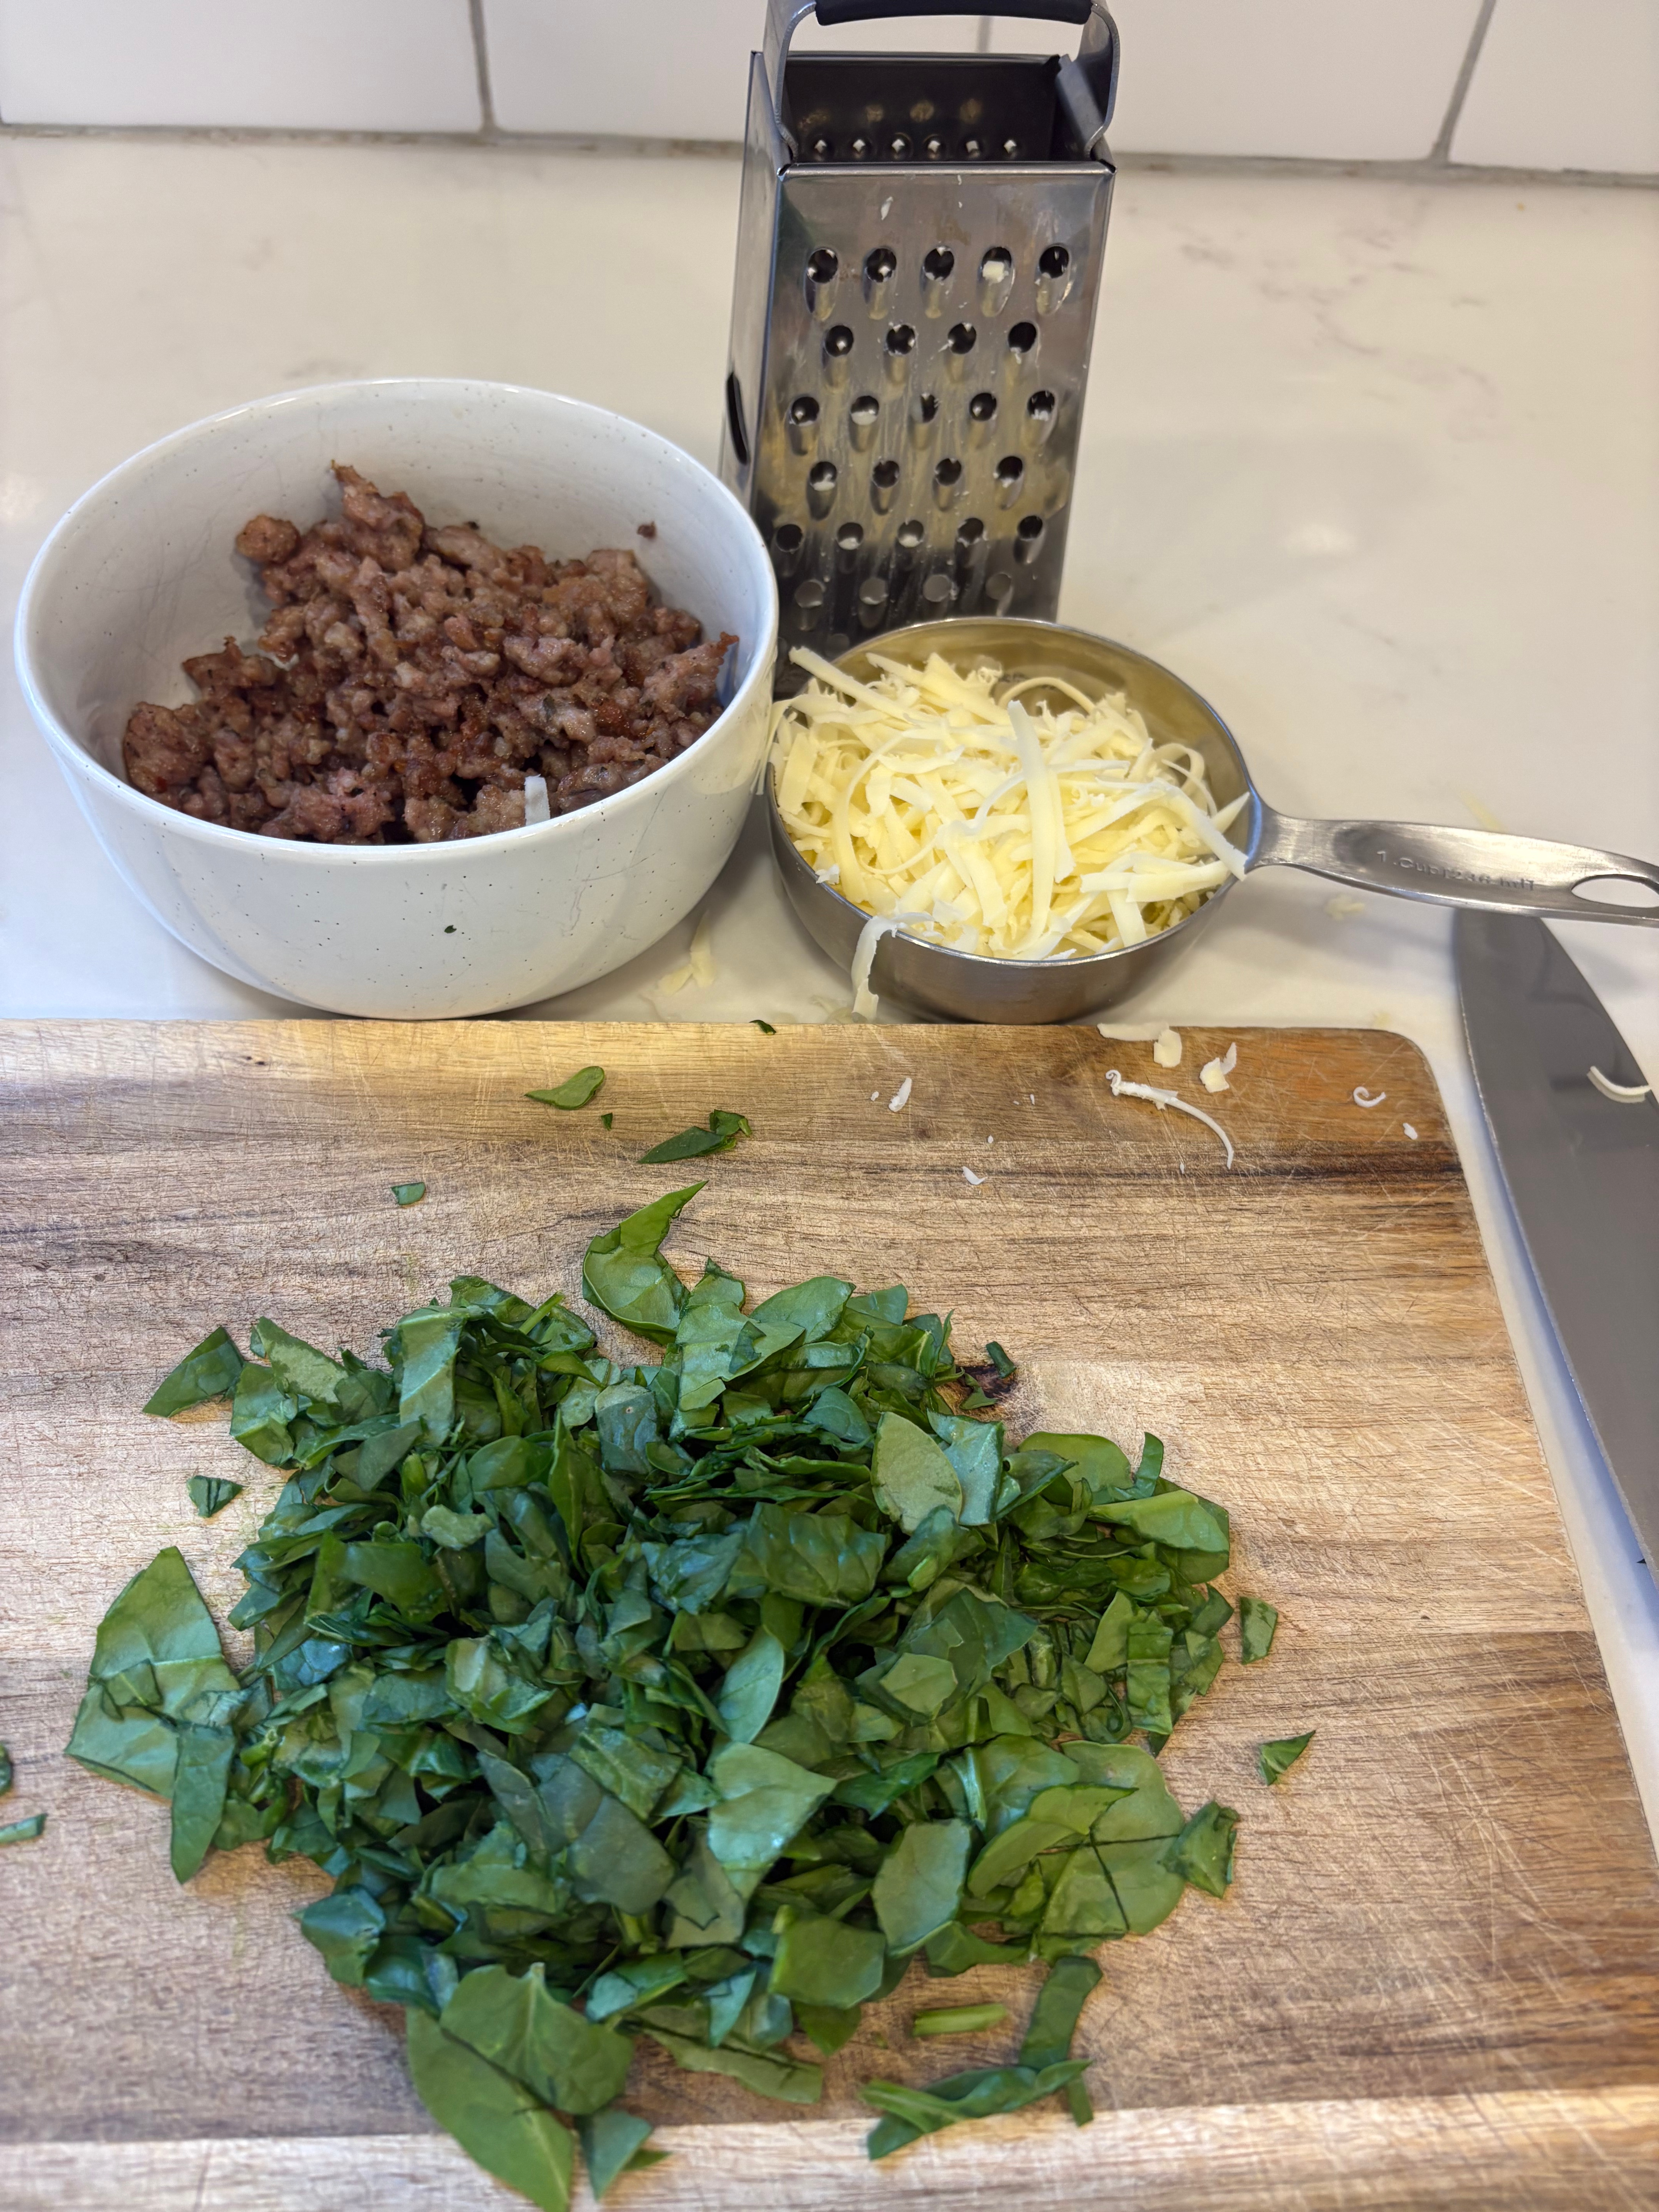
I chop up a handful of Spinach to give it a healthy veggie flair. A couple of eggs and cheese give it more protein and the rest is Gluten Free Flour (with xantham gum) and a couple of other baking items you most likely have in the cupboard.
Here is the official list of ingredients and their measurements.
1 Cup Cottage Cheese
2 Large eggs (plus one more if you want to do an egg wash)
2 T melted butter or avocado oil
1.5 Cups GF all purpose baking flour with Xantham gum
2 t Baking powder
1/2 t baking soda
1/2 t salt
1/2 t sugar (optional)
1/2 lb cooked breakfast sausage, crumbled and cooled
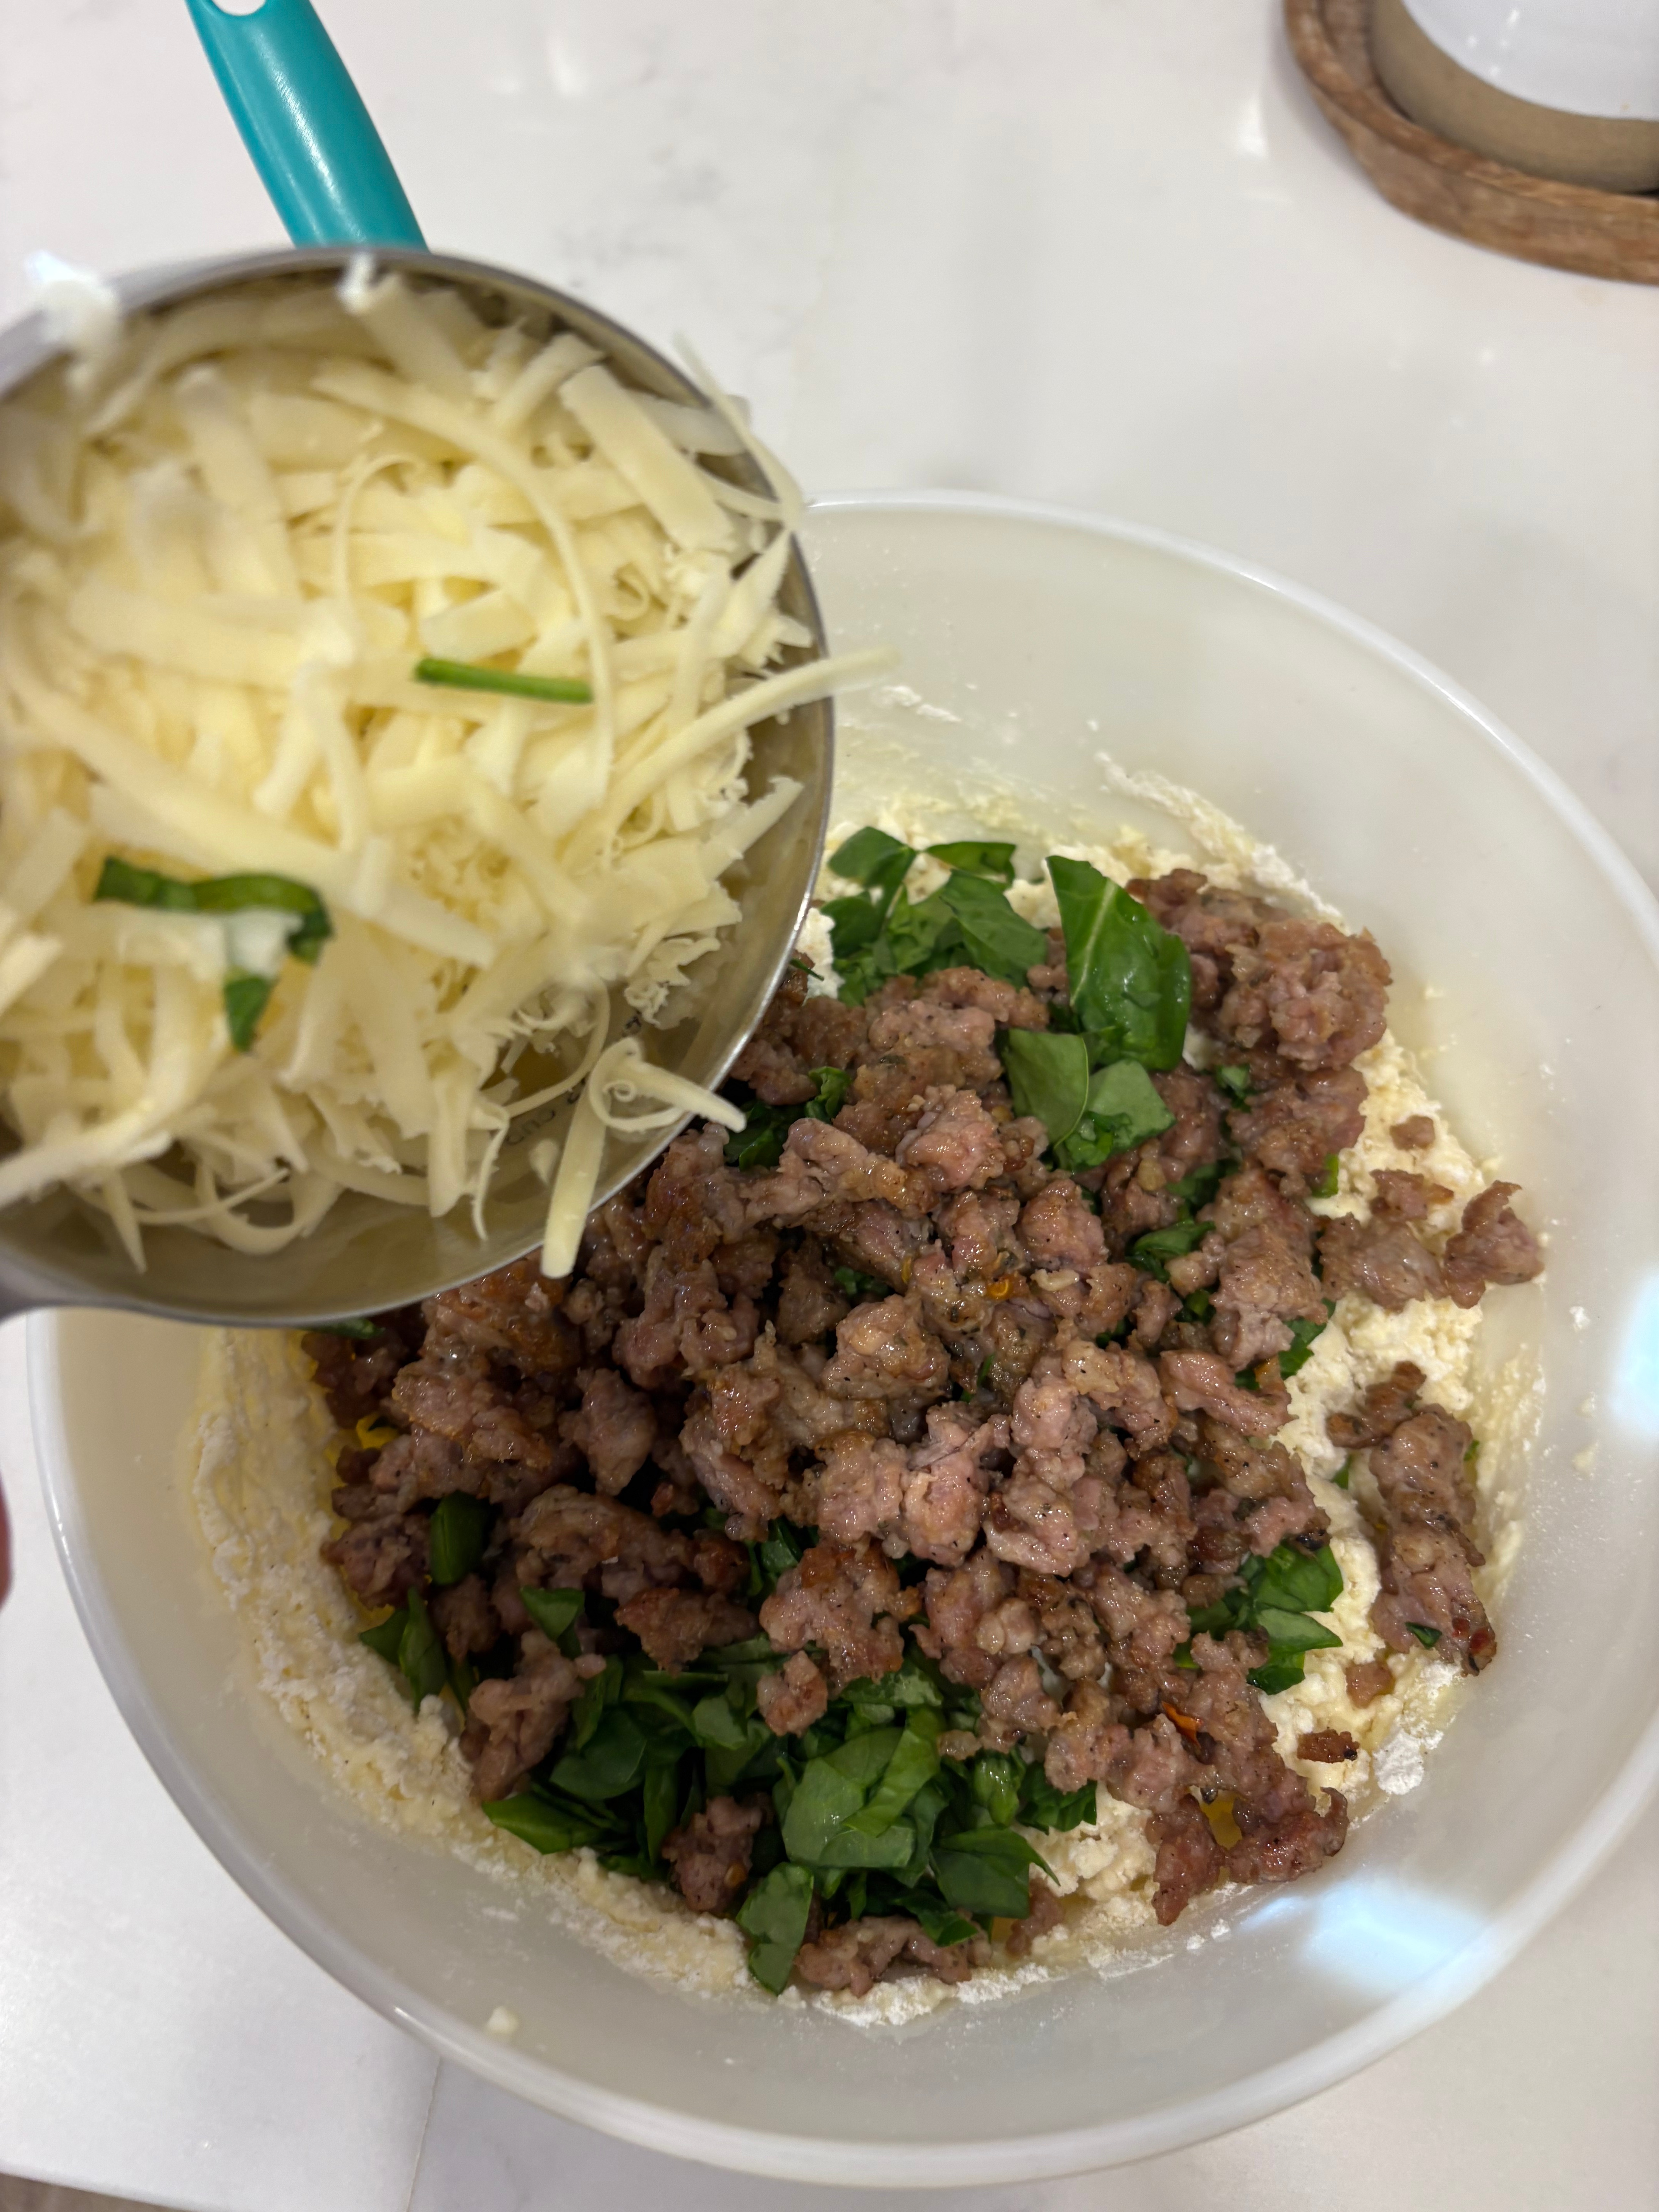
1/2 Cup shredded cheddar cheese
1 Cup spinach chopped
Cook sausage and cool. I prefer the iron skillet
Preheat oven to 400 and line baking sheet with parchment paper
In a food processor or blender, combine cottage cheese, 2 eggs and melted butter or oil.
Mix dry ingredients- in a large bowl, whisk together flour, baking powder, baking soda, salt, sugar
Add cottage cheese mixture to the dry ingredients and stir until just combined
Gently mix in the cooked sausage, cheese and spinach
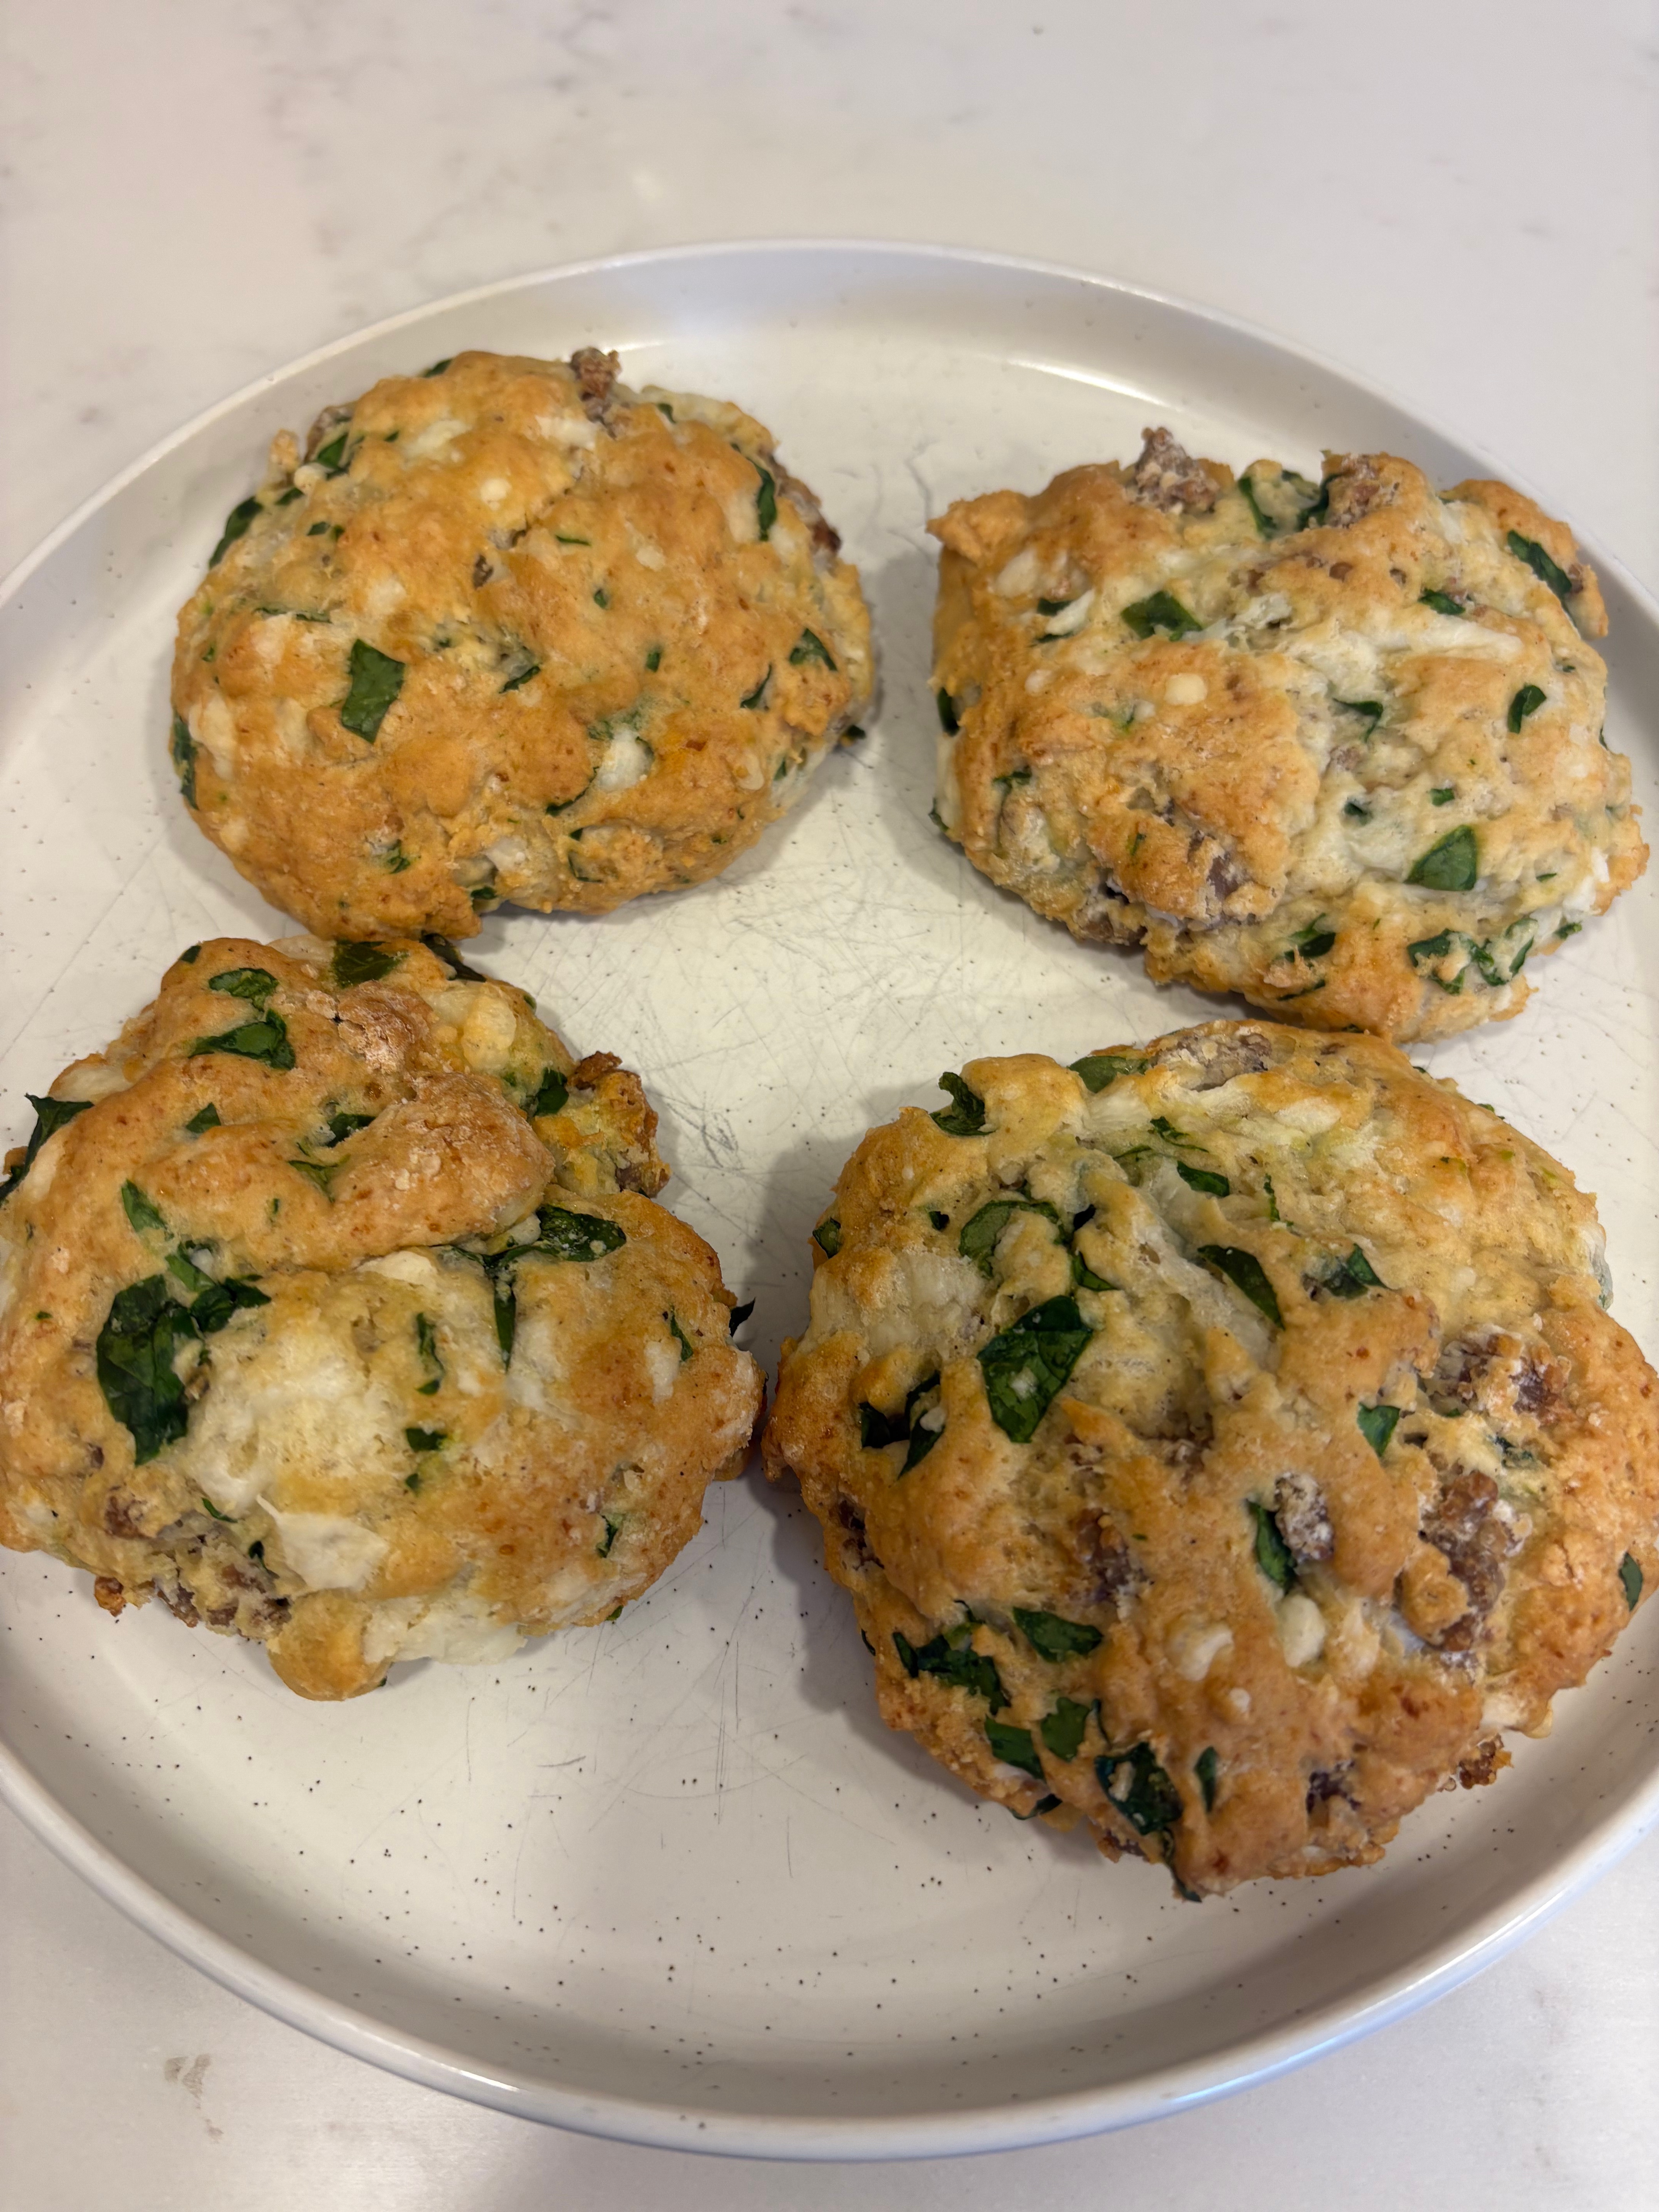
Shape biscuits- using a large spoon or your hands, drop dough onto baking sheet
(For extra credit, beat 1 egg with 1 T water and brush tops. This will give the biscuits a golden finish)
Bake 15-18 minutes until golden brown and cooked through. Checking with a fork.
Add butter if desired, serve and enjoy
They grow quite a bit as they bake, so be mindful of that. I usually make 8-12 with this recipe. Depending on how big I want them. I think they taste better when I make only 8, but they go fast, so if I want more, I make smaller ones and have 12. They taste great heated up the next day too. They are much better warm than cold. Everyone in the family loves these, which always feels like a home run to me.
Here are the pictures of how I did it.
Let me know what you think. Also, if you try any other ingredients, let me know. We’ve done shredded zucchini before and it’s turned out great.
One of our favorite dinners as a family is Taco Pie. Last week our friend and neighbor Steph who has 3 young boys was looking for a new dinner idea and Chelsea told her about Taco Pie. We hadn’t made it in a while and I was reminded by her and her family how delicious it was, so we brought it back on our weekly menu.
I love it for many reasons. It’s healthy and delicious, loaded with plenty of veggies and lean protein. It can be made beforehand and reheats easily. Everyone in the family enjoys it and it’s something different that you don’t see everyday. It can also be made gluten free, which is important for me since Matteo and Chelsea both have a gluten allergy.
This delicious dinner came to us from our dear friend Peggy Curry. She wrote an amazing cook book called Damn Good Gluten Free.
I was actually with her during the time when she was getting all of the photos taken for it and putting it together. I got to help her make some of the dishes and even got a few pictures of myself with her delicious food in her beautiful cookbook.
It was one of those blessings that comes from a seemingly unfortunate situation. I had been unceremoniously fired from my job of 7 years, a week before Christmas, with a 3 year old and a 9 month old. I wasn’t worried, as I have been fired before and it always worked out fine. So I knew something better was coming. Since I wasn’t working, I was able to spend my days with Peggy and Laura Dart, her incredible photographer and help out with the making of the cookbook.
Then, long story short, covid happened, they closed the yoga studios and the beach and we moved to Tennessee.
In fact 17 years ago today, I was fired from my well paying corporate sales job and it ended up being the best thing for me. From that place, I pivoted and decided to follow my heart. I became a surf instructor, bartender, sous chef, yoga teacher, met Chelsea, became a dad, etc.
Now, back to this Taco Pie…
First gather all of the ingredients. I use organic if possible. You will need:
Can of refried beans
Mexican cheese
Onion
Bell Pepper
Zucchini
Frozen corn
1 lb Ground Chicken or Turkey
Salt, Pepper, Taco Seasonings of your choice
Ketchup
3 Gluten Free Tortillas
Directions: Preheat oven to 350
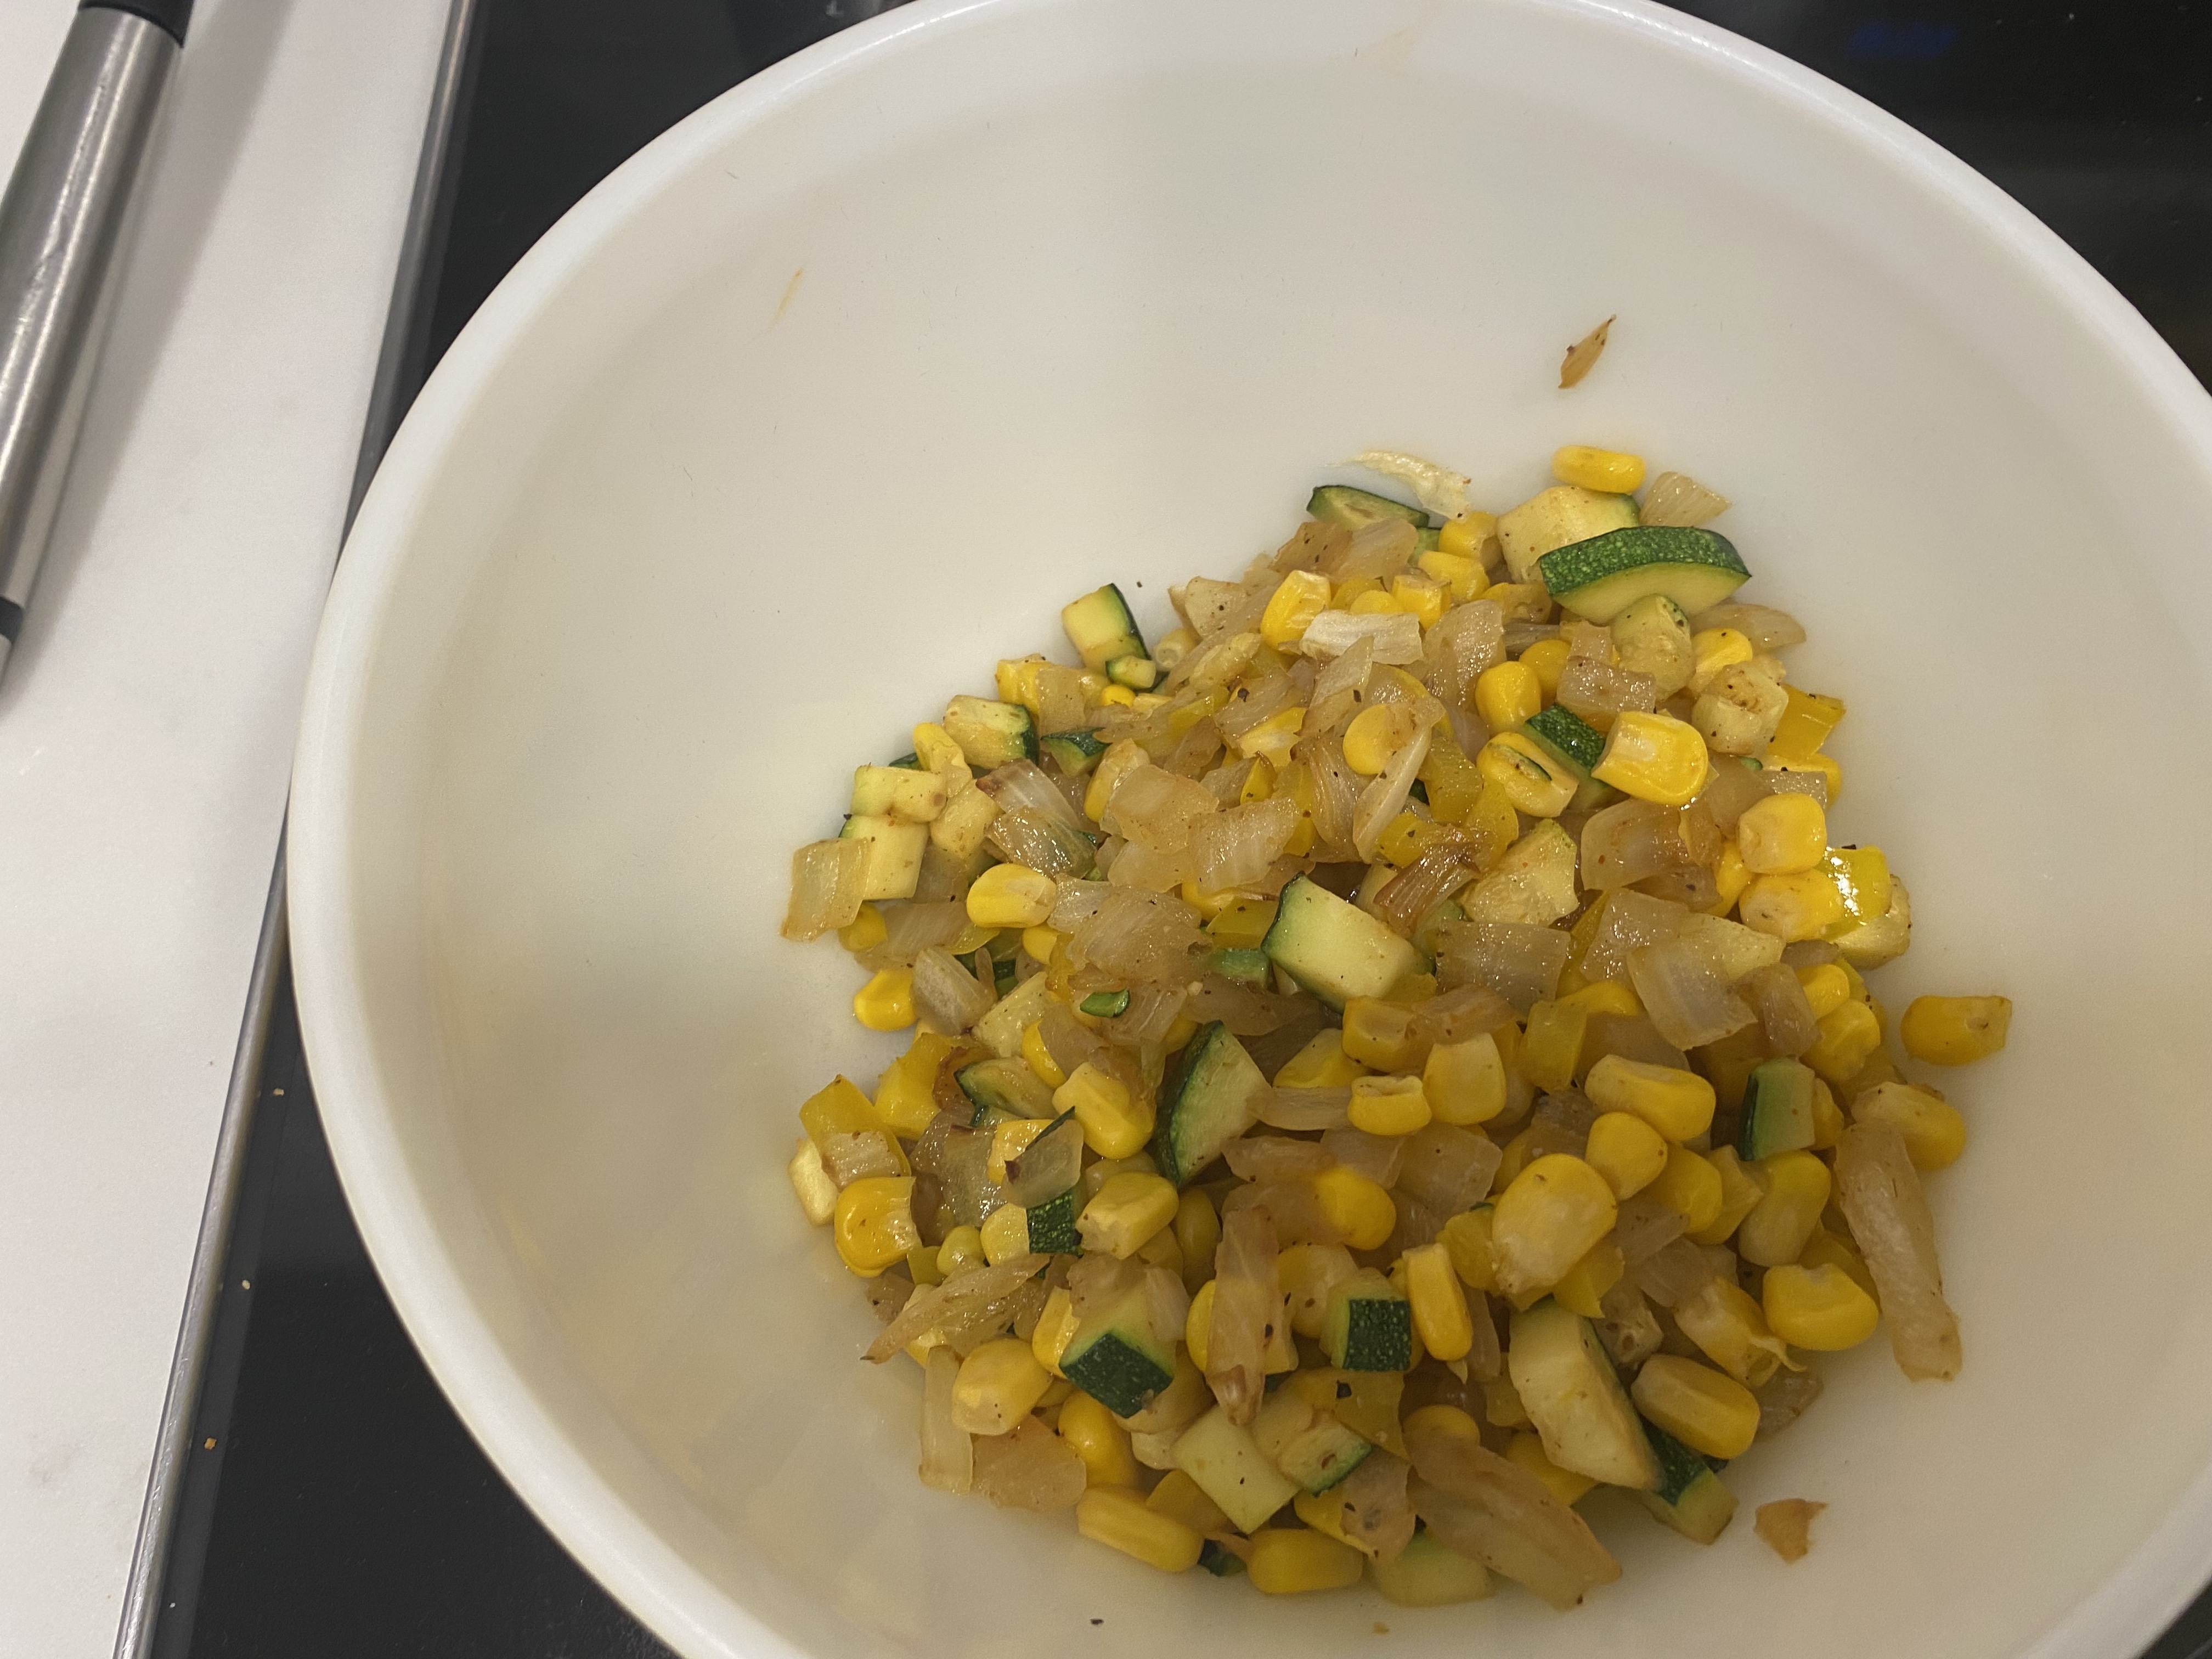
Step 1: In a large skillet (I use cast iron) add olive oil and cook down onions, then bell peppers, then zucchini. Add salt, pepper and some of the taco seasonings to the veggies as they cook. Cook for a few minutes to get a little char on the veggies and then add the corn. Take the veggies out and set aside in a bowl.
Step 2: Next add a little more oil to the pan and add the ground meat and season with salt, pepper and the rest of the taco seasonings. When the pink is gone add ketchup. Mix around and cook on low for about 10 minutes to let the ketchup and spices absorb into the meat.
Step 3: While the meat is cooking, you can prep the tortillas. I have found with the gluten free tortillas that it is helpful to bake them for a couple of minutes first so they are not as soggy.
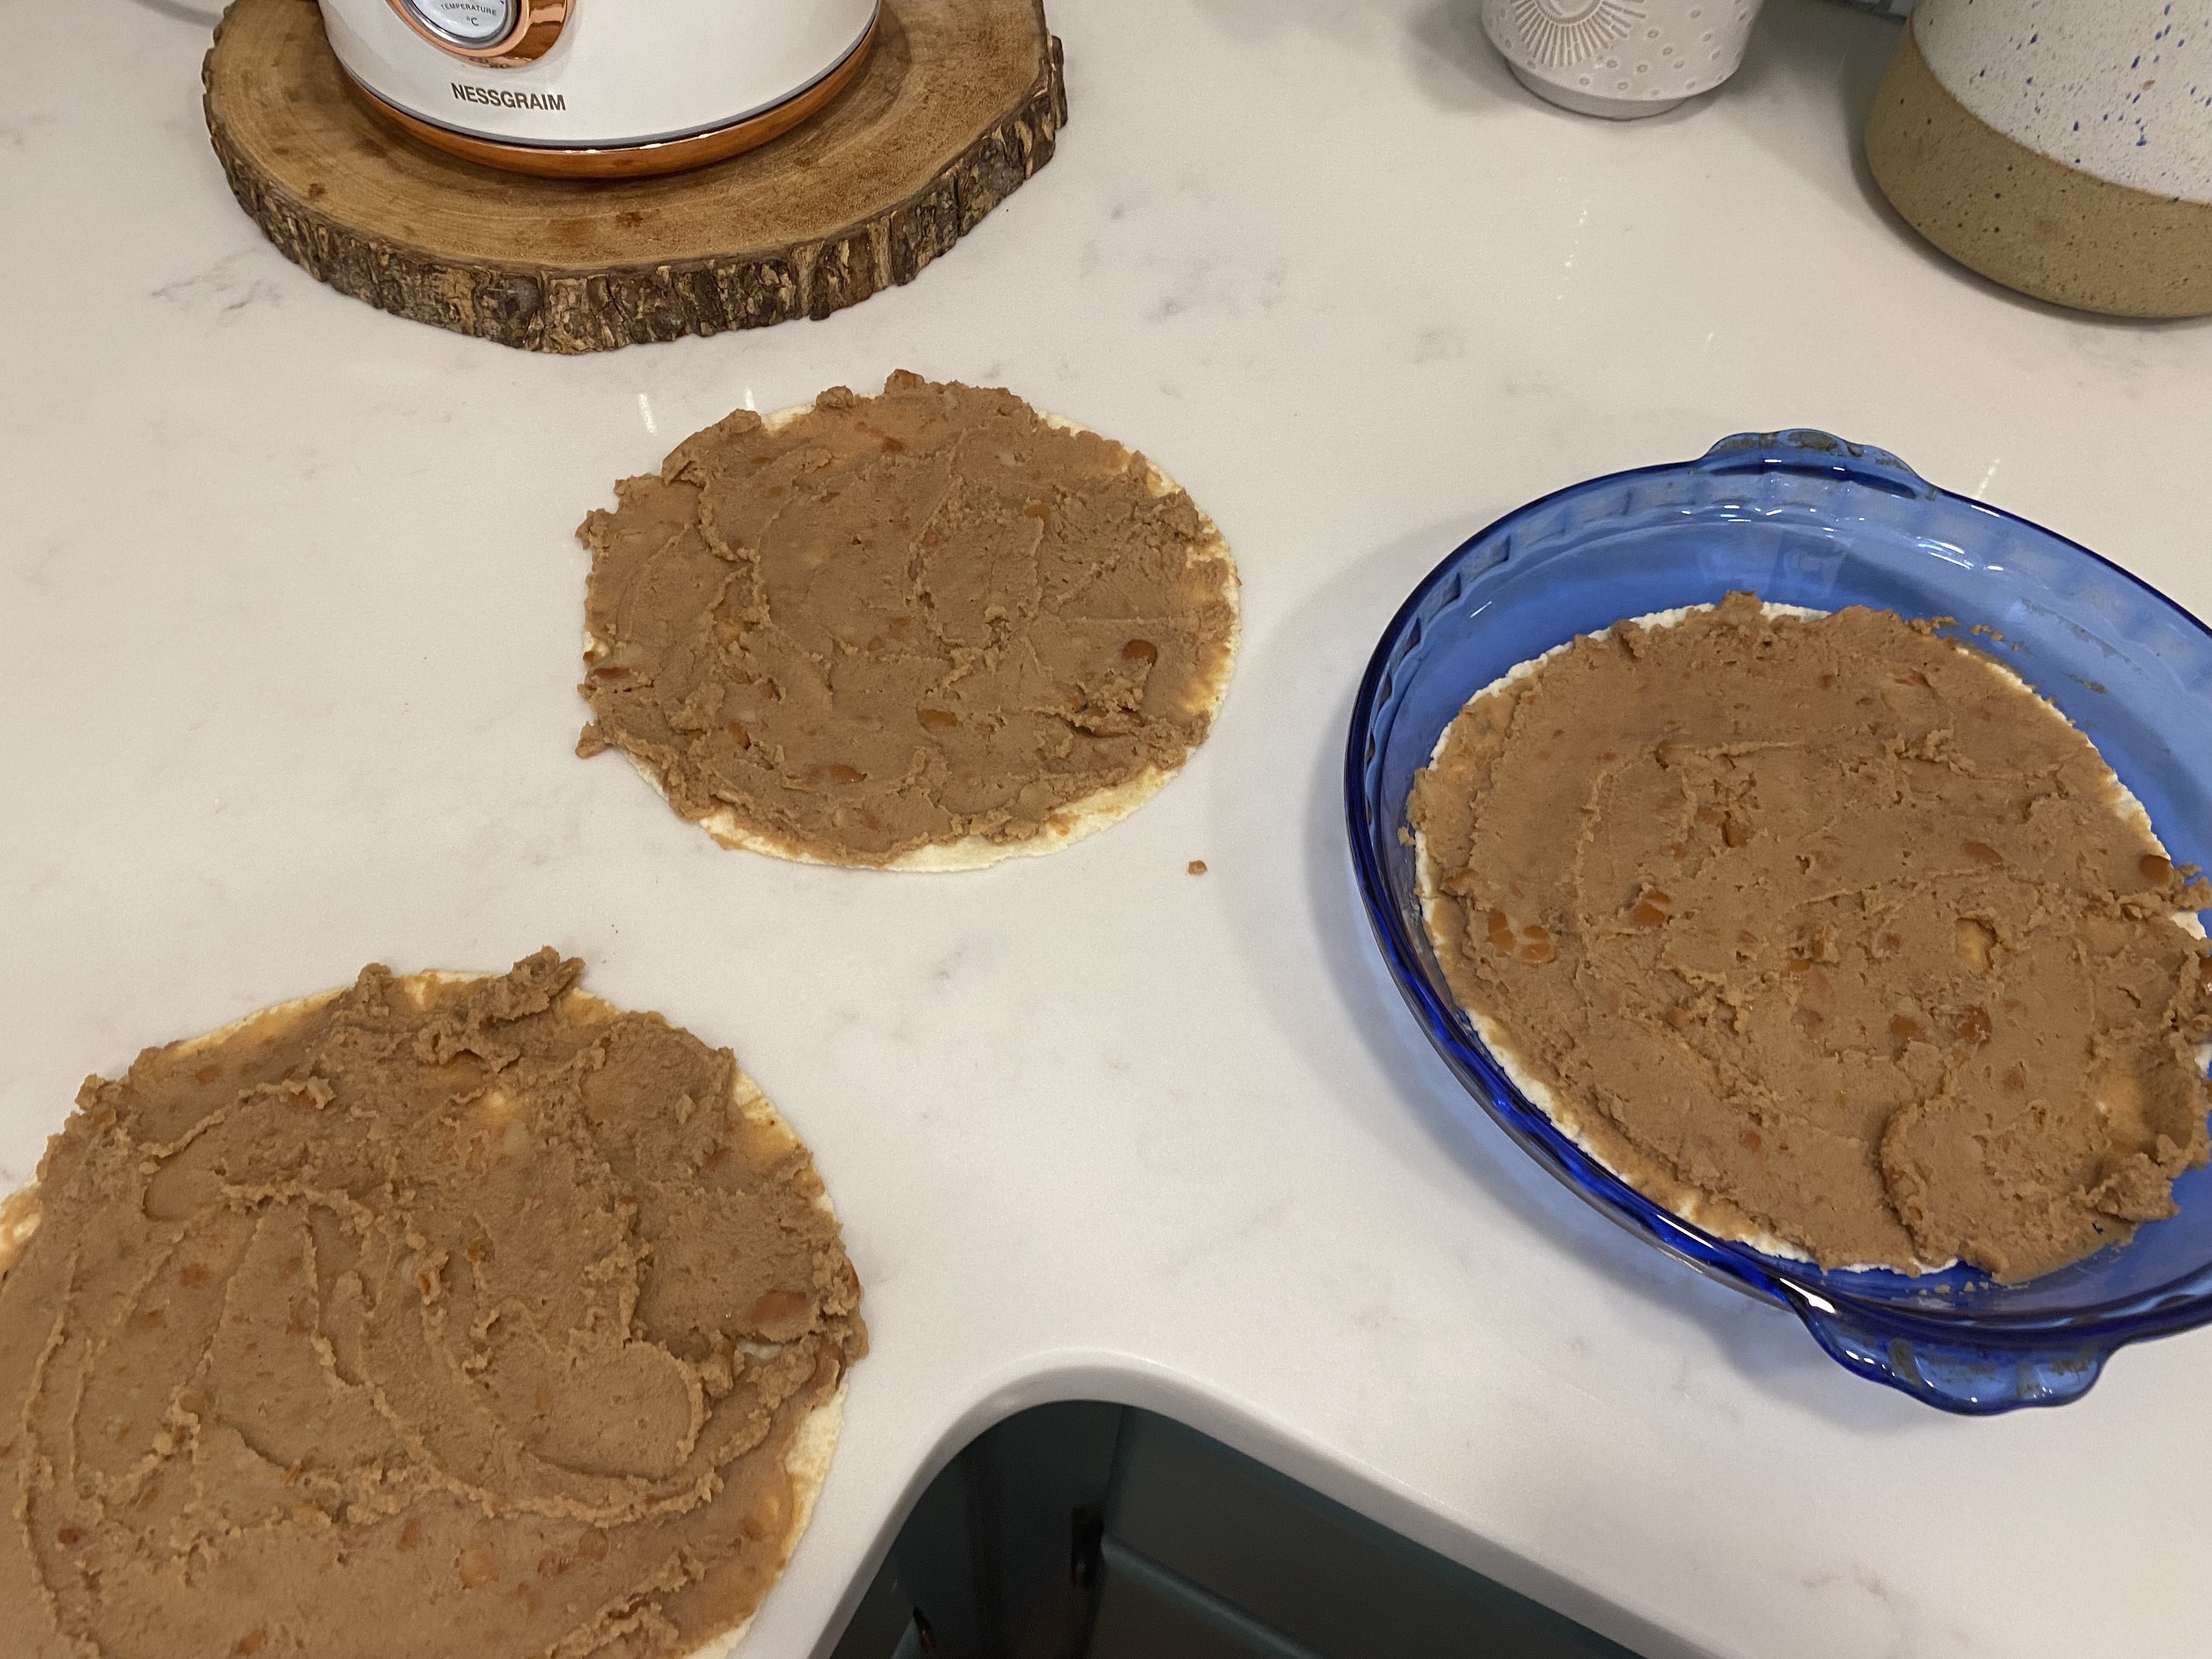
Step 4: Add 1/3 of the refried beans to each of the tortillas.
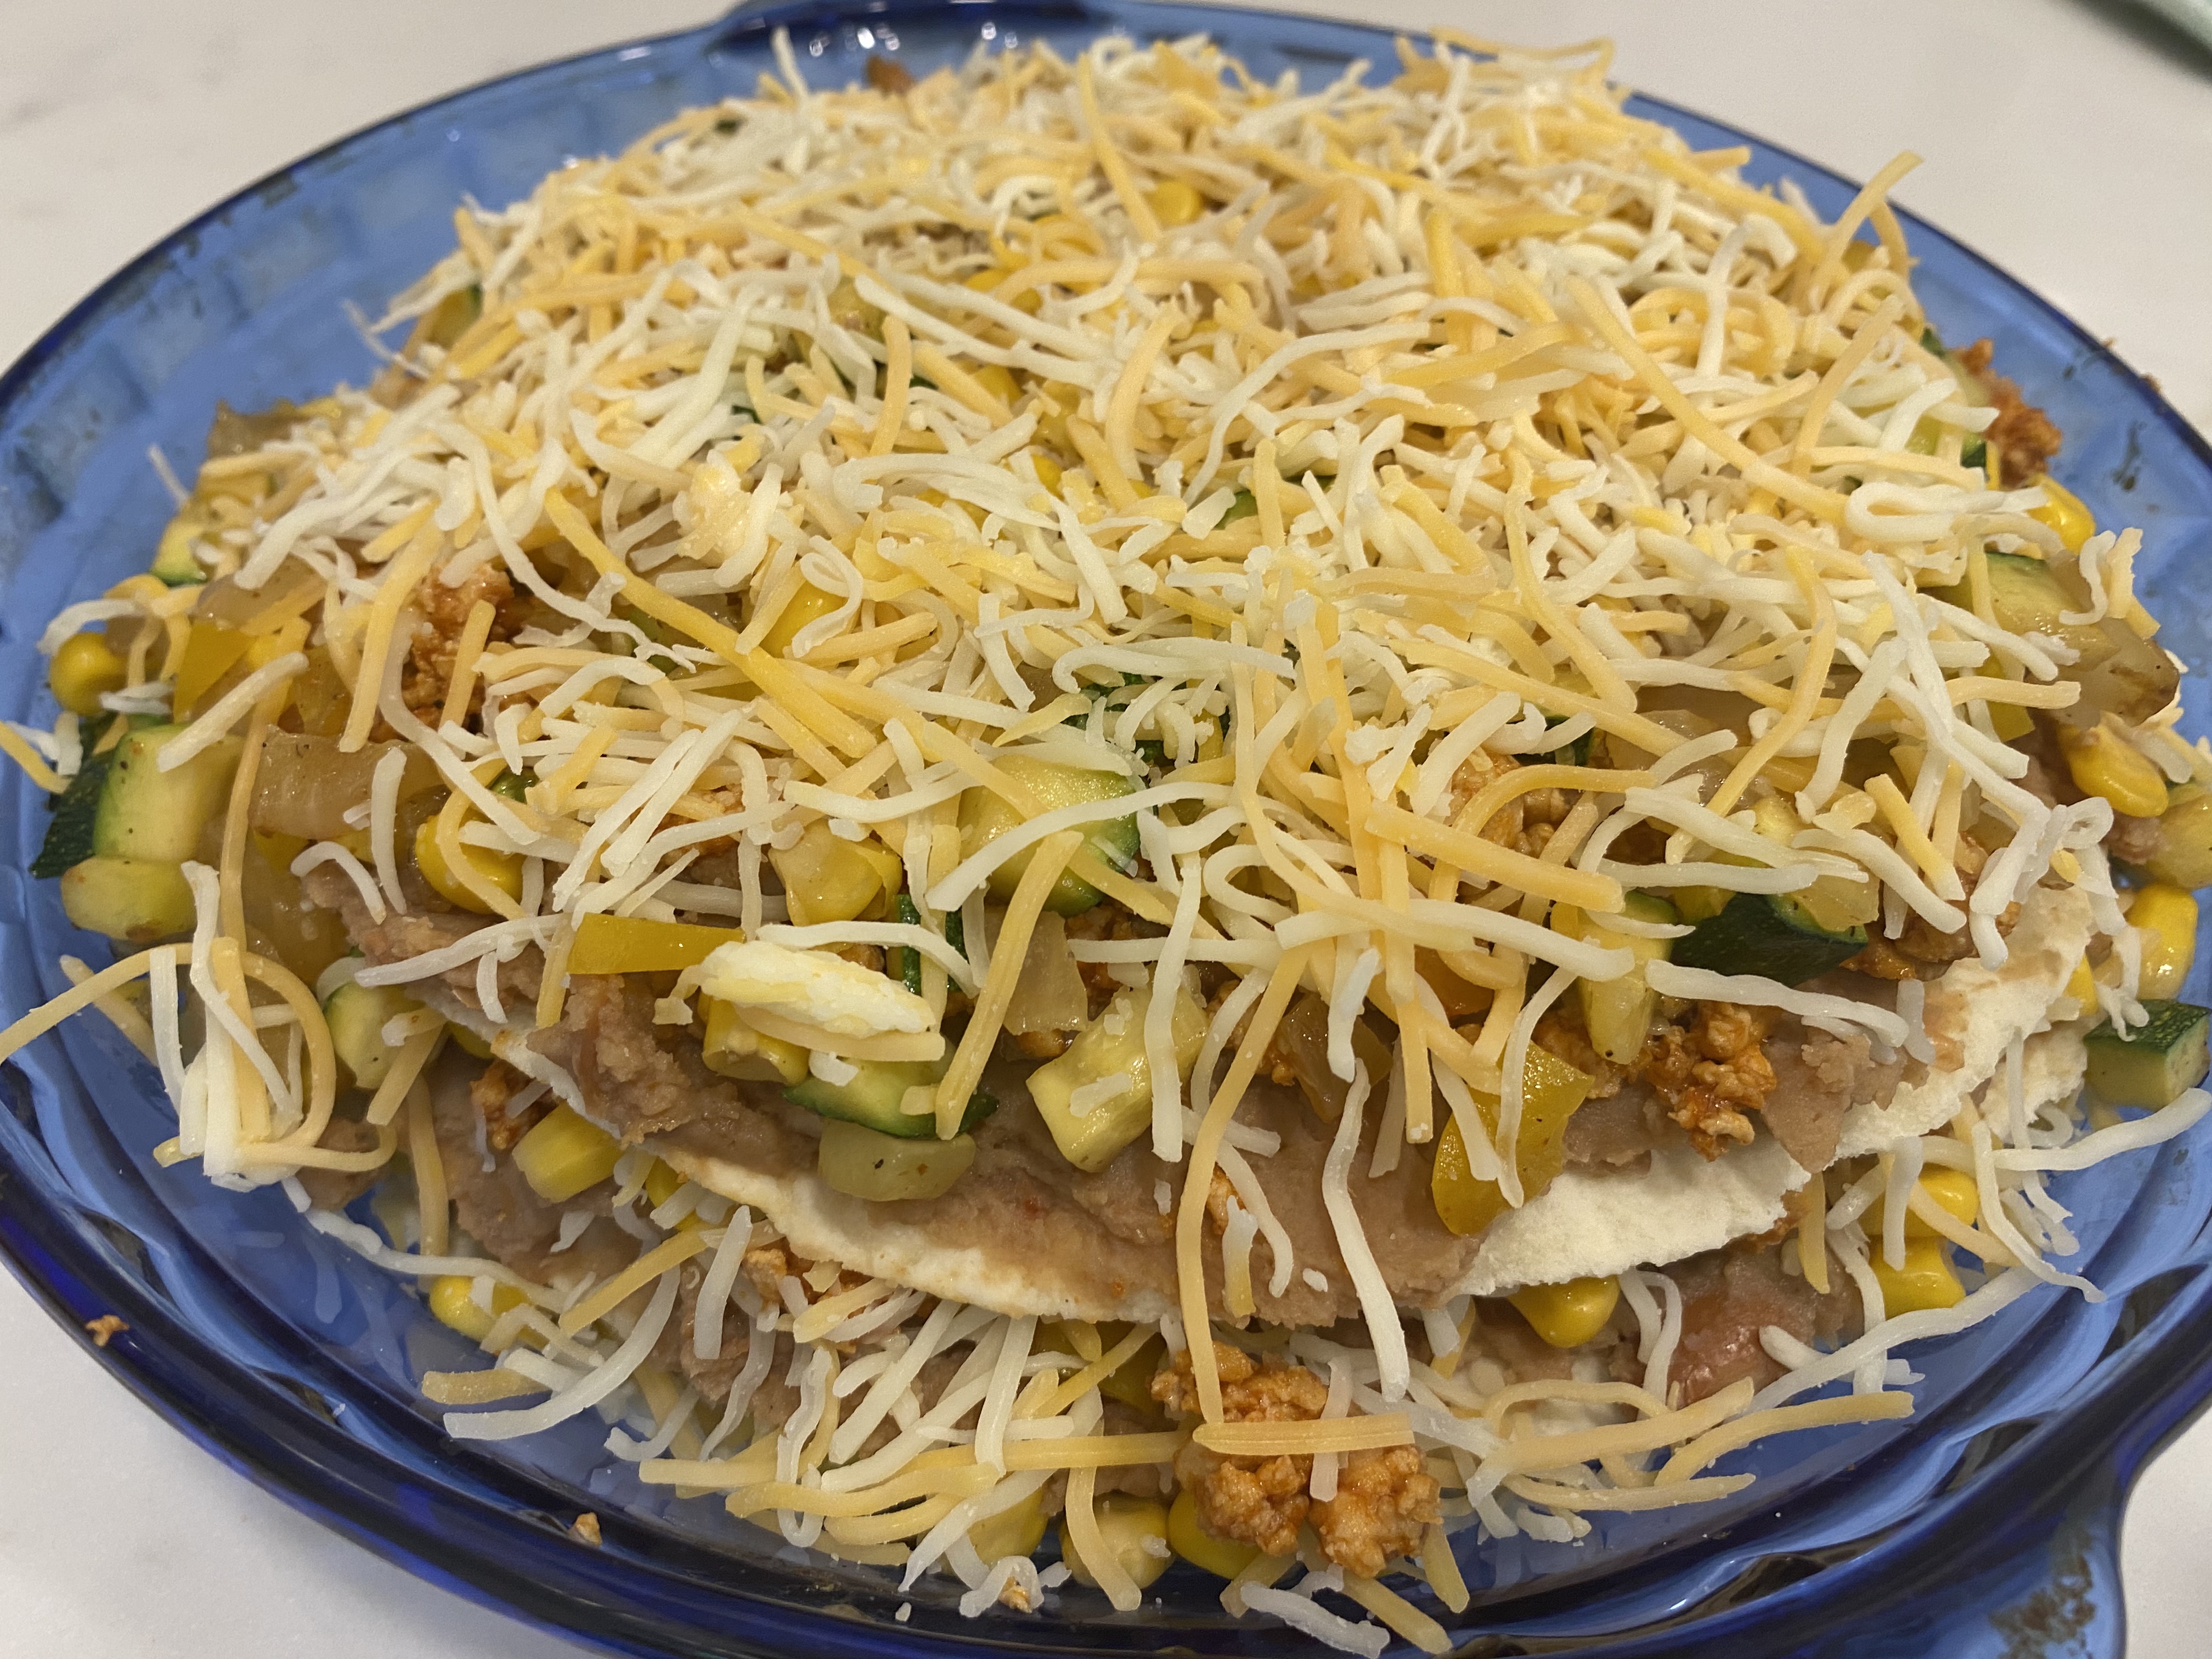
Step 5: Place the first tortilla with the refried beans in the pie dish. Then add 1/3 of the veggies and 1/3 of the meat to the tortilla. Sprinkle on cheese and then repeat two more times building the pie into 3 layers.
Once everything is assembled you can cover and save in the fridge for later, or bake at 350 for 20 – 30 minutes or until cheese is melted and the tortillas are at your desired crispiness…Enjoy
A couple of months ago I realized that I have been making and enjoying my own kombucha for the last two years now. I know it was two years, because I was bartending at the time in downtown Nashville at Pinewood Social, when a fellow employee and I were talking about kombucha. She had been making her own for the past little while and had an extra SCOBY. She offered it to me and I eagerly accepted.
I had always wanted to make my own kombucha, but I had no idea how to do it. Chelsea had made it back in the day when she lived in Hawaii, but didn’t really have the desire to do it again. I loved the health benefits of kombucha and the fizziness and the different flavors. I don’t drink sodas, except for plain soda, so this gives me something fun to drink that’s actually good for me.
The hardest part in my mind to making your own kombucha was getting the SCOBY. Kind of like getting a queen bee for your bee hive, its essential. SCOBY stands for Symbiotic Culture of Bacteria and Yeast. It’s the fermentation starter that kicks off kombucha fermentation.
So now that I had my queen, I needed to learn how to take care of her and actually make the kombucha. Sure, I could watch some youtube videos and learn everything I needed to know from the internet, but I’m more of a hands on type of person when it comes to learning tactile things. I want to see it in action and talk about it and ask questions and all of that helps me understand and remember it.
Well it just so happened that our dear friend Shann, (Shannon Larsen) and her boyfriend, now fiancé Zander, (Alexander Puentes) came to visit us. Zander had been brewing his own kombucha for years and even made a PDF on how to do it. I still reference it to make sure I’m doing everything right.
He walked me through the steps and I am sharing those with you in this blog post and in the youtube video my kids and I made last year. Brewing your own ‘booch’ is a little bit of a process and takes some time. Not too much, but there are a few steps you need to remember.
Click on the video to see how we make it.
A SCOBY is a living organism that continues to grow. It is also called “the mother” because it will eventually have “babies”. These can be given away, like my friend did for me and like I have done for several neighbors and friends over the last couple of years. Or they can be saved or used to make multiple batches. Mine is getting really big at the moment and I am hoping it will split off soon so I can have another one and make more. Each batch gives me 5 pint sized glass bottles of kombucha. So if I can have two going at once, then we can have plenty to both enjoy and share with friends.
I love giving away my kombucha to friends. When I find out someone is into it, I’ll give them a bottle. It’s so fun to say, here you go, I made this. Enjoy. Then you know it’s going to taste good and be good for them. How awesome is that? If they’re really into it, I’ll offer them one of my SCOBY offspring and they can start to make their own.
Last Summer I had two SCOBY’s going and we went on vacation. When we came back, fruit flies had gotten into one of them. So I had to let it go. Fortunately I had the second one, which I am still using today.
I try to make a new batch every 10 days or so, but sometimes I’ll get out of the habit and it sits for a couple of weeks and that’s ok. The SCOBY just keeps on livin’.
We use our ‘booch’ a few different ways.
In the morning for breakfast, I pour a little shot for the boys. To get them some healthy probiotics to start the day.
I also make popsicles with it and we enjoy these in the afternoons.
Finally at night, when I’m craving a drink besides water and don’t want to drink alcohol, then a little kombucha and soda over ice is a satisfying mocktail.
I love finding healthy things that the whole family enjoys. It also feels good to be able to make this on my own. I know where it comes from. Me, my kitchen. I’m putting my positive energy into it when I make it. I love doing it. It’s fun to make things, I love drinking it and it’s good for me. So it seems like it’s one of those beautiful things that hits on all levels. If you want to give it a try and make your own, go for it. If you find yourself a SCOBY, then check back here for what to do next. Here are the steps that I learned from my friend Zander with my own personal modifications.
First, bring 6 cups of water to a boil. Remove from heat, then, add 6 -7 bags of black tea and steep for 30 minutes. Squeeze and remove the tea bags and add 1 cup of organic cane sugar. Stir until dissolved.
Now fill your pitcher with 8 cups of filtered water. Add the hot tea. The temperature of the tea should cool to under 100 degrees.
Add the 2 cups of the starter liquid that came with your SCOBY and stir with a wooden spoon, (it doesn’t like metal).
Now add the SCOBY.
Cover with a cloth and use a rubber band to keep it on. This will keep out fruit flies or any other bugs, but still allowing the SCOBY to breathe.
That comes up to a total of 16 cups of liquid, which is one gallon or 128 ounces. So make sure you have a gallon size glass container to keep your brew. You also want an opening at the top of at least 3 or more inches so your SCOBY can grow and breathe.
That’s it! Now you just have to wait. Anywhere from 7-21 days, depending on several factors, but I’ve found that 10 days is the sweet spot for me. The temperature has a lot to do with it. We keep our house pretty warm and I place it in a cabinet. You can start tasting after 5 days and when it seems ready to you, then it’s time to move on to the 2nd Ferment
The Second Ferment is the fun part where you get to flavor your kombucha. There are many different flavors and recipes out there, but we usually just keep it simple and do Lemon and Ginger.
This is the flavor that my wife and kids like the best. I will often experiment with different flavor combinations, depending on what fruits are in season and what we have at the house at the time of the 2nd ferment. But Lemon and Ginger always seems to be the best.
Before you put the kombucha in the bottles, be sure to take out the SCOBY and 2 cups of the liquid and put it into a glass container. Cover this with a cloth and rubber band like you just did before and now you have your starter for the next batch. You can get started and make another one right away, going back to step 1 and boiling tea or simply let it sit in your cupboard for up to a month or more. Give it a stir every week or so, just to keep it happy.
Today I did 5 bottles of Lemon/Ginger and 1 bottle of the Lilac syrup that we made from our lilac bushes that were blooming this week. They only bloom for a couple of weeks a year, so I thought, why not give it a try.
If you have a juicer, you can experiment with different flavor combinations and see what you like the best.
For the lemon and ginger, all I do is peel the ginger with a spoon, then dice it up into little chunks and drop 4-5 little cubes into the bottle. Then I will squeeze the juice out of 1 lemon and then evenly distribute it in the 5 bottles with the ginger.
Once you have your flavor in the bottle, add the kombucha to the bottle and fill it almost to the top, leaving about an inch of air. This helps the carbonation process. Put the cap on and turn it over a couple of times to mix up the ingredients.
All you have to do now is wait a few days and your brew will be ready to go. 3 days seems to be the sweet spot for me. By having the bottles capped, the CO2 has no way to escape, so this creates natural carbonation. When they have reached your desired carbonation, then put them in the fridge and enjoy. Refrigerating the kombucha will pretty much stop the carbonation process. The longer you leave them out of the fridge, the more carbonated they will get, but they will also get more sour. So again, depending on your preference, find your sweet spot.
Apparently, if you leave them out too long, they can explode. Although I’ve never had this happen to me or anyone I know, I have had them give out quite a ‘pop’ when I burp them after they’ve been fermenting for more than 3 days.
Ok, there you go. Have fun and enjoy. There are so many health benefits to drinking kombucha and so many different ways to enjoy it. I’d love to hear about your experience. Cheers!
If you’re a vegetarian, just do all the veggies and it will make a delicious, healthy dinner, but personally, I love the salty, crispy skin and tender meat that this technique delivers.
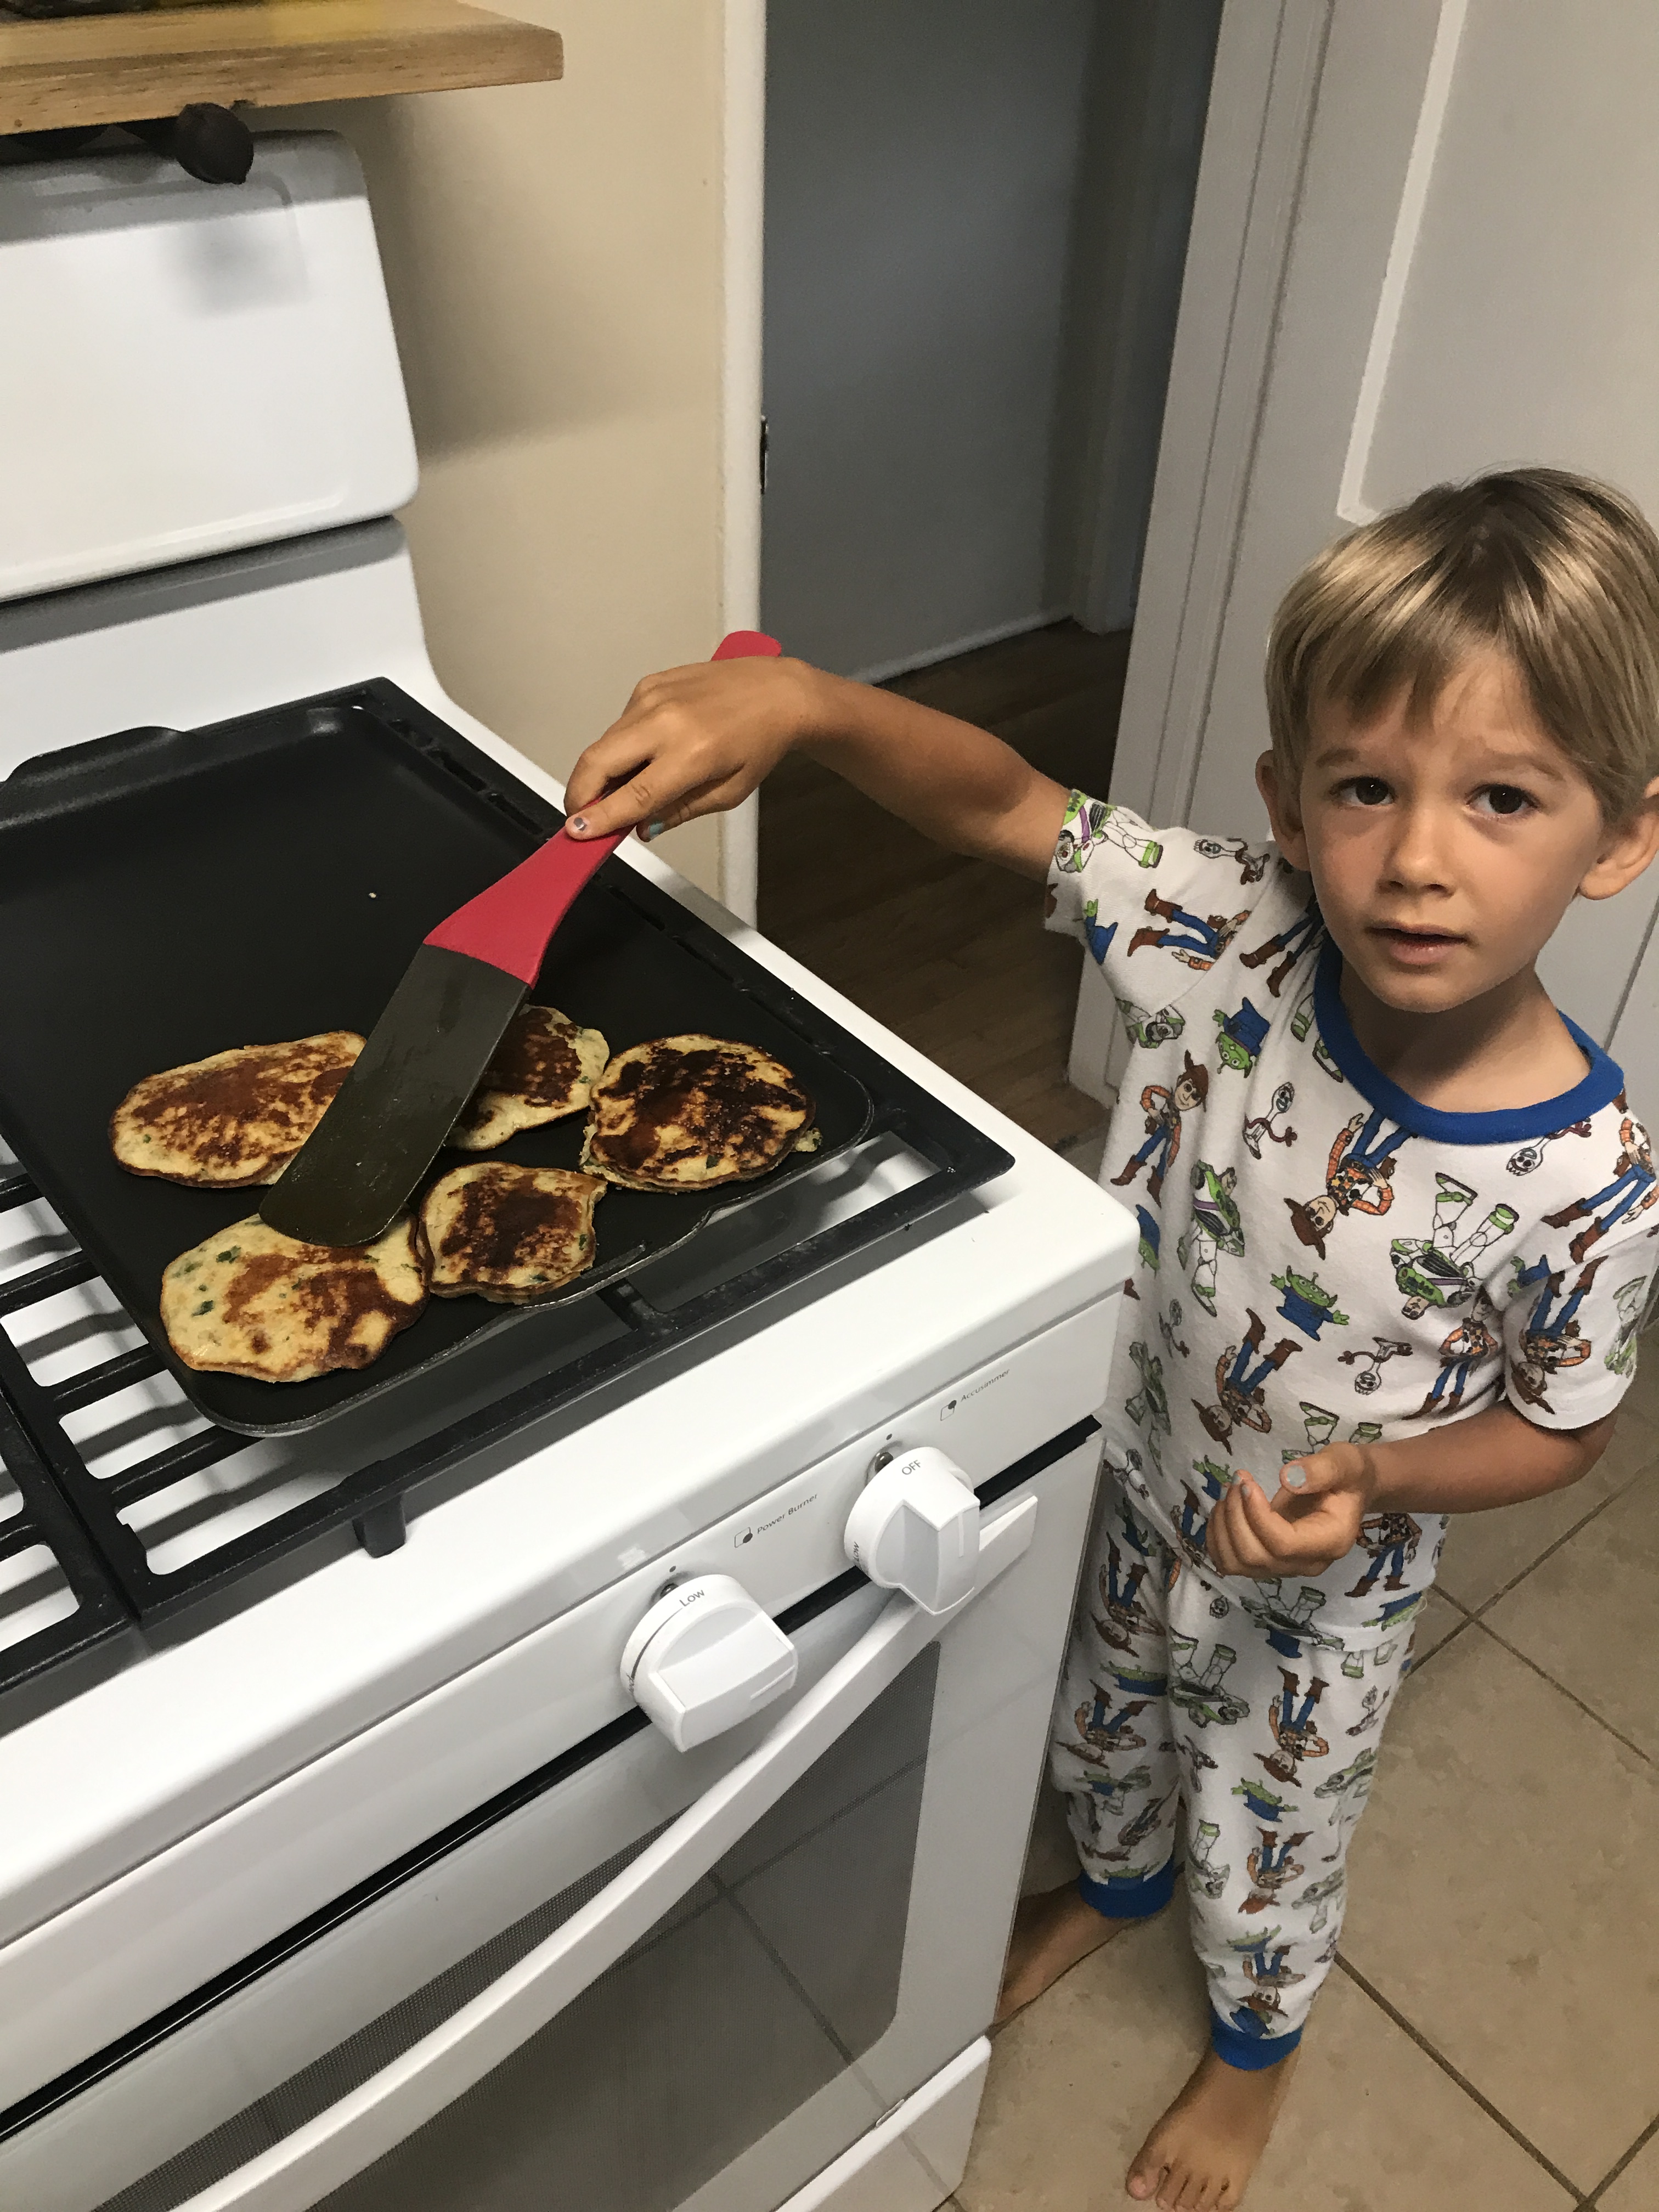
I never really made pancakes, nor ate them until I had kids. I’m pretty selfish with my calories and never wanted to use them on what seemed like just a filler food to me. Then we had Matteo and Chelsea started making these delicious banana pancakes for him when he first started eating food. We would play the song Banana Pancakes by Jack Johnson and eat them together as a family.
Now they are my thing. I make them at least once a week. Whenever we have two ripe bananas I say, Hey Matteo, who is now four, want some banana pancakes? He gets excited and says, YES!
I sneak in a handful of frozen spinach so there is not only a fruit, but a veggie involved. The pancake mix we use is gluten free and has 20 g of protein per serving. Plus the protein from the egg. I’d say that’s a pretty healthy pancake. They are also filling and give a sustained energy throughout the morning.
A note on the frozen spinach. We take a bag of organic spinach and freeze it for smoothies. Here is a life hack… if you put it in your hands and crush it, it shatters like you just finely chopped it. This makes it easy to add to dishes you are cooking without any prep work.
It’s an ongoing challenge for us to get Matteo to eat enough food. When he doesn’t eat enough, like the rest of us, his mood changes. He starts to act in ways we don’t like. So we do our best to help mitigate this by finding things that he enjoys eating, that are also good for him nutritionally. This isn’t necessarily easy, but it is very important to us, so we look for foods that meet this criteria.
Sure I could give him pasta and bread like he wants, like every kid wants, but I want him to eat vegetables and proteins, so that he can grow and develop into his full potential. I imagine this is a challenge for many parents. Therefore this is a recipe every parent should have in their arsenal.
They also make for a healthy snack to take with you on the run.
Chelsea teaches zoom yoga from our home in the mornings on Tuesday, Thursday and Sunday. So on those days, I need to get the boys out of the house. Usually we go on a morning bike ride. Me riding Owen in the front of my beach cruiser and Matteo, who just learned to ride his bike during quarantine, riding on his bike. Owen Loves them too, but it kinda looks like he’s pooping in this picture.
I’ll always remember the first time Matteo made it on his bike all the way down to the Bay Club in Redondo Beach. Which is about 5 miles South from where we live.
We were on the bike strand coming home and could see the Manhattan Beach pier coming up ahead of us. We still had about 2 miles left to go and I knew Matteo was going to run out of gas soon. He had been high on adrenaline for having made it that far for the first time on his bike. We were celebrating as we were riding back. He was so proud of himself and me of him, but I knew reality was about to set in.
All of a sudden he says, “Daddy, I can’t make it any further”
In my head I’m thinking, you’ve got no choice buddy. Mommy is teaching a yoga class right now and there is no one else who can come get us. This was during quarantine, so we couldn’t just hop in an uber or taxi like the old days. Luckily we had eaten pancakes that morning and I brought a couple of the leftovers with me. So I said, hey buddy let’s stop here for a minute and have one of these pancakes.
He ate two of them, Owen ate one and we were on our way again. The break and the pancakes gave him all the energy he needed to get back on his bike and ride it all the way home.
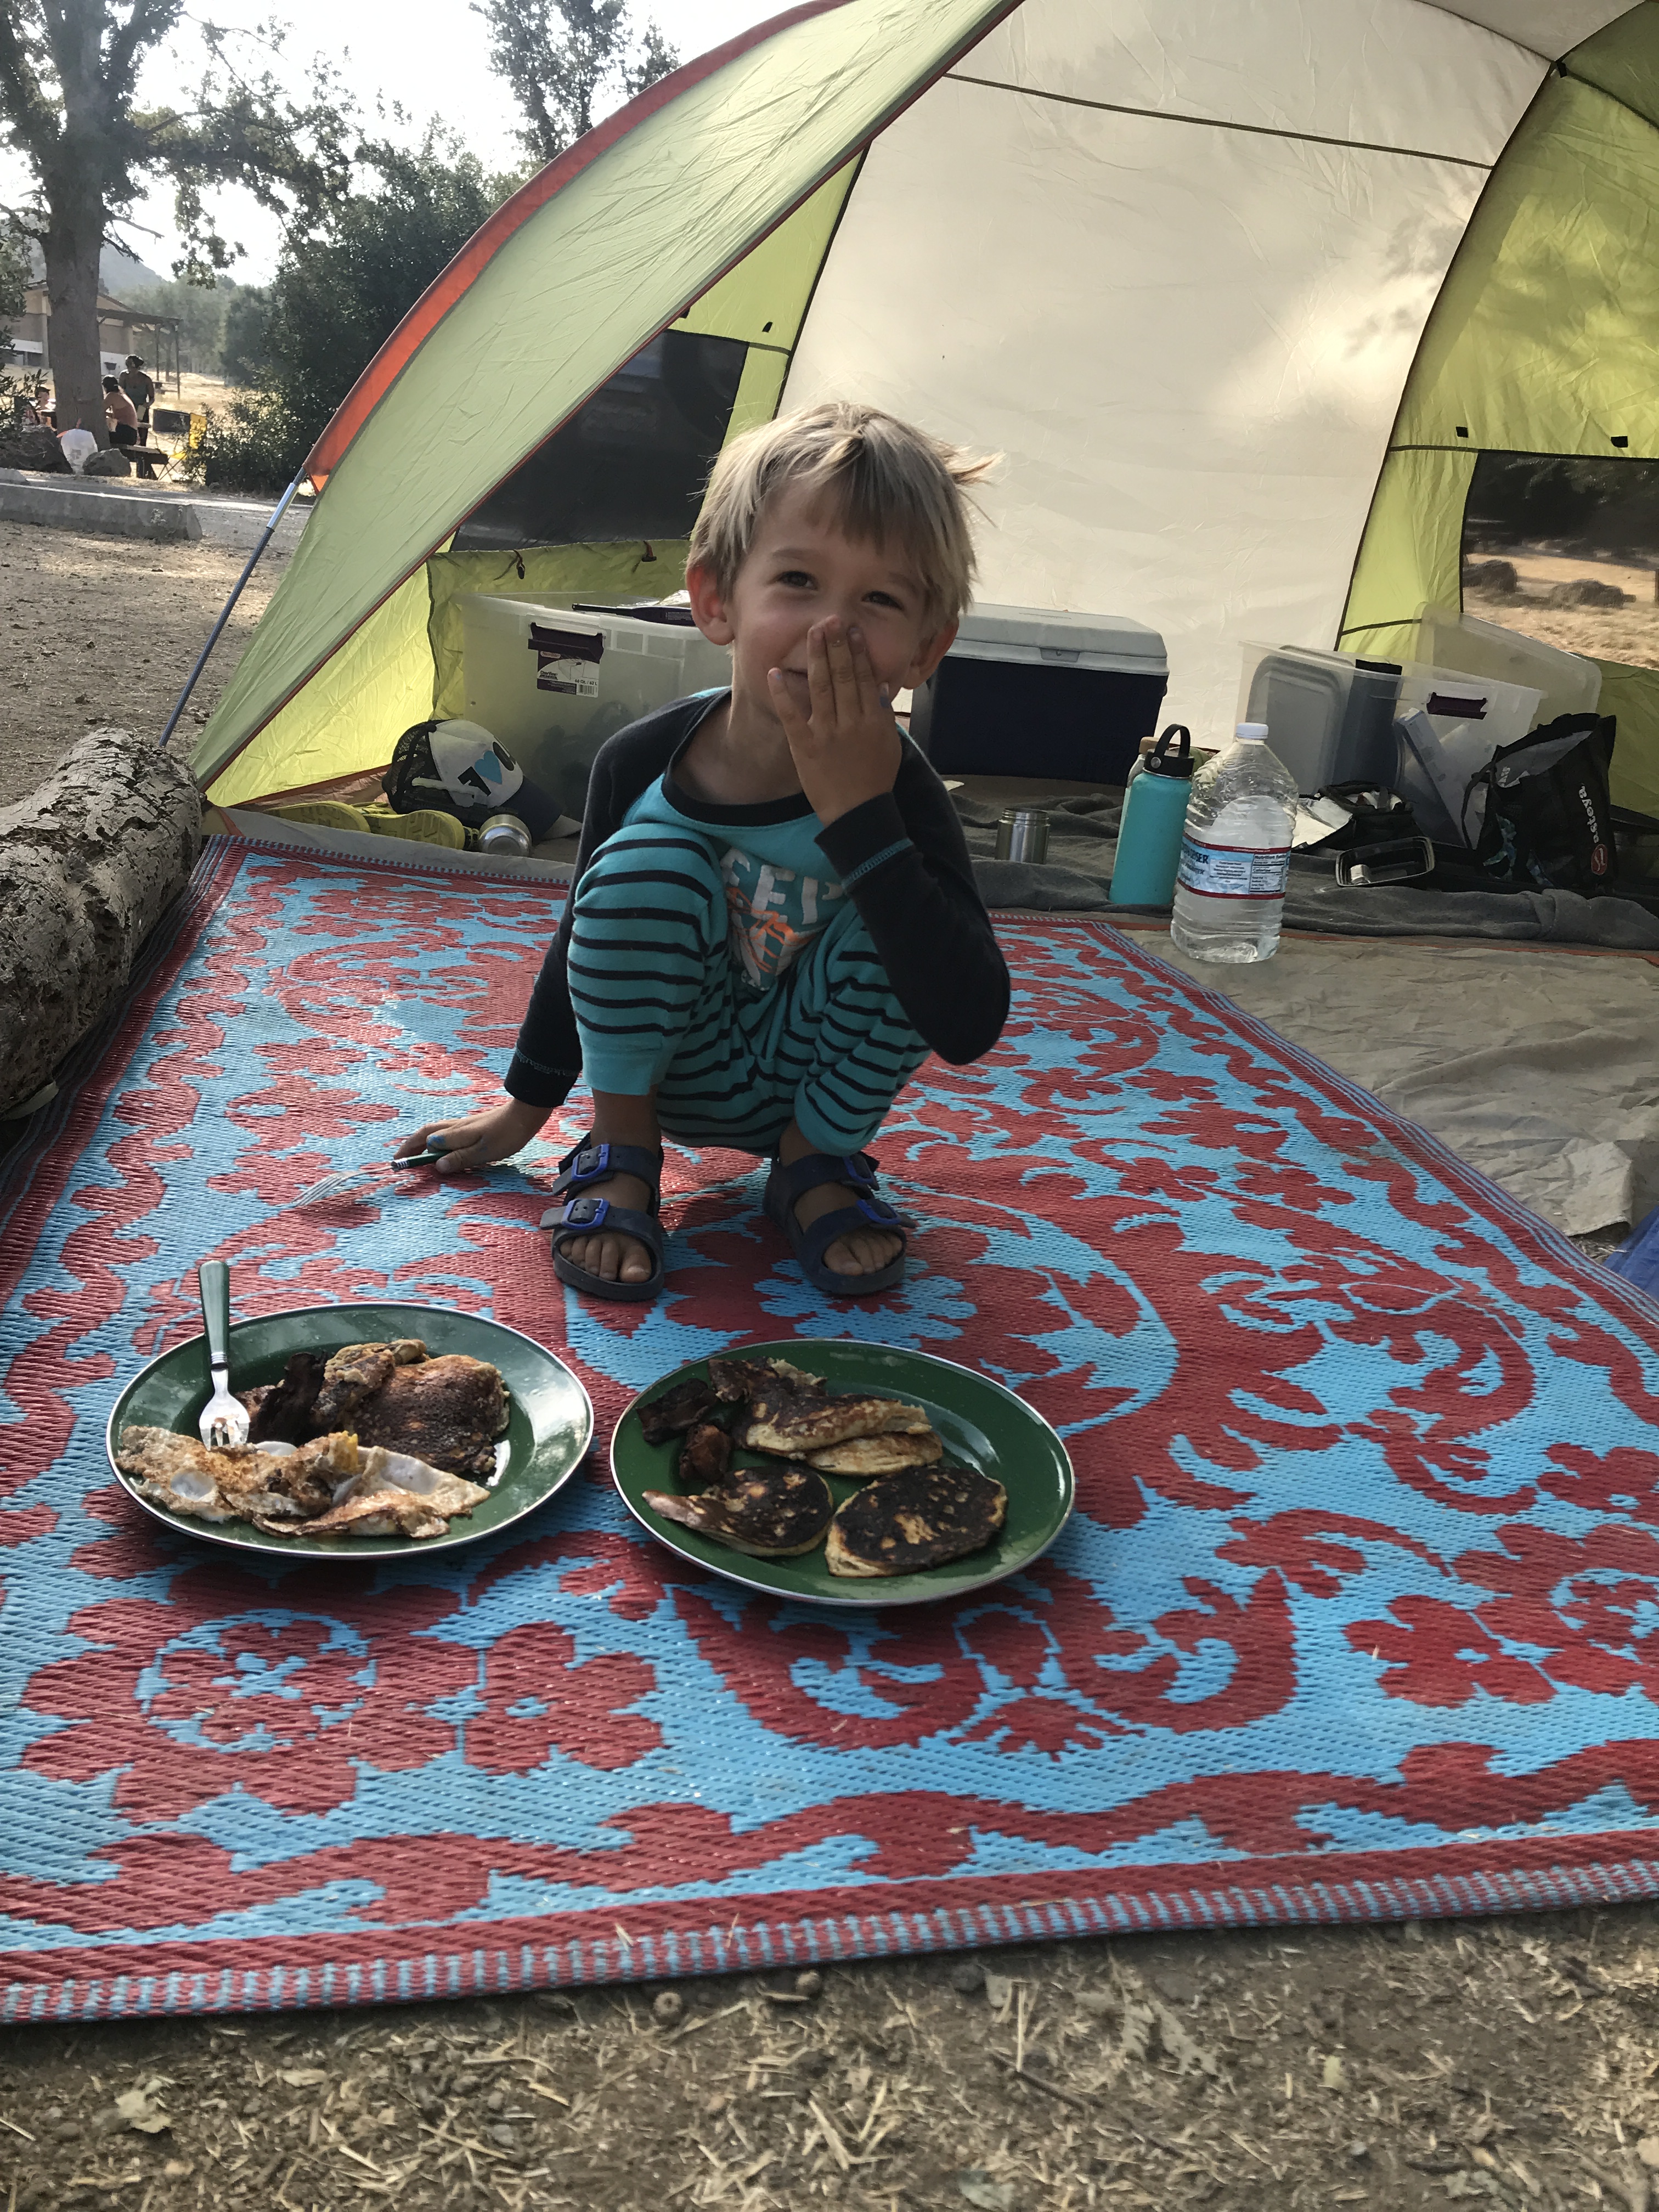
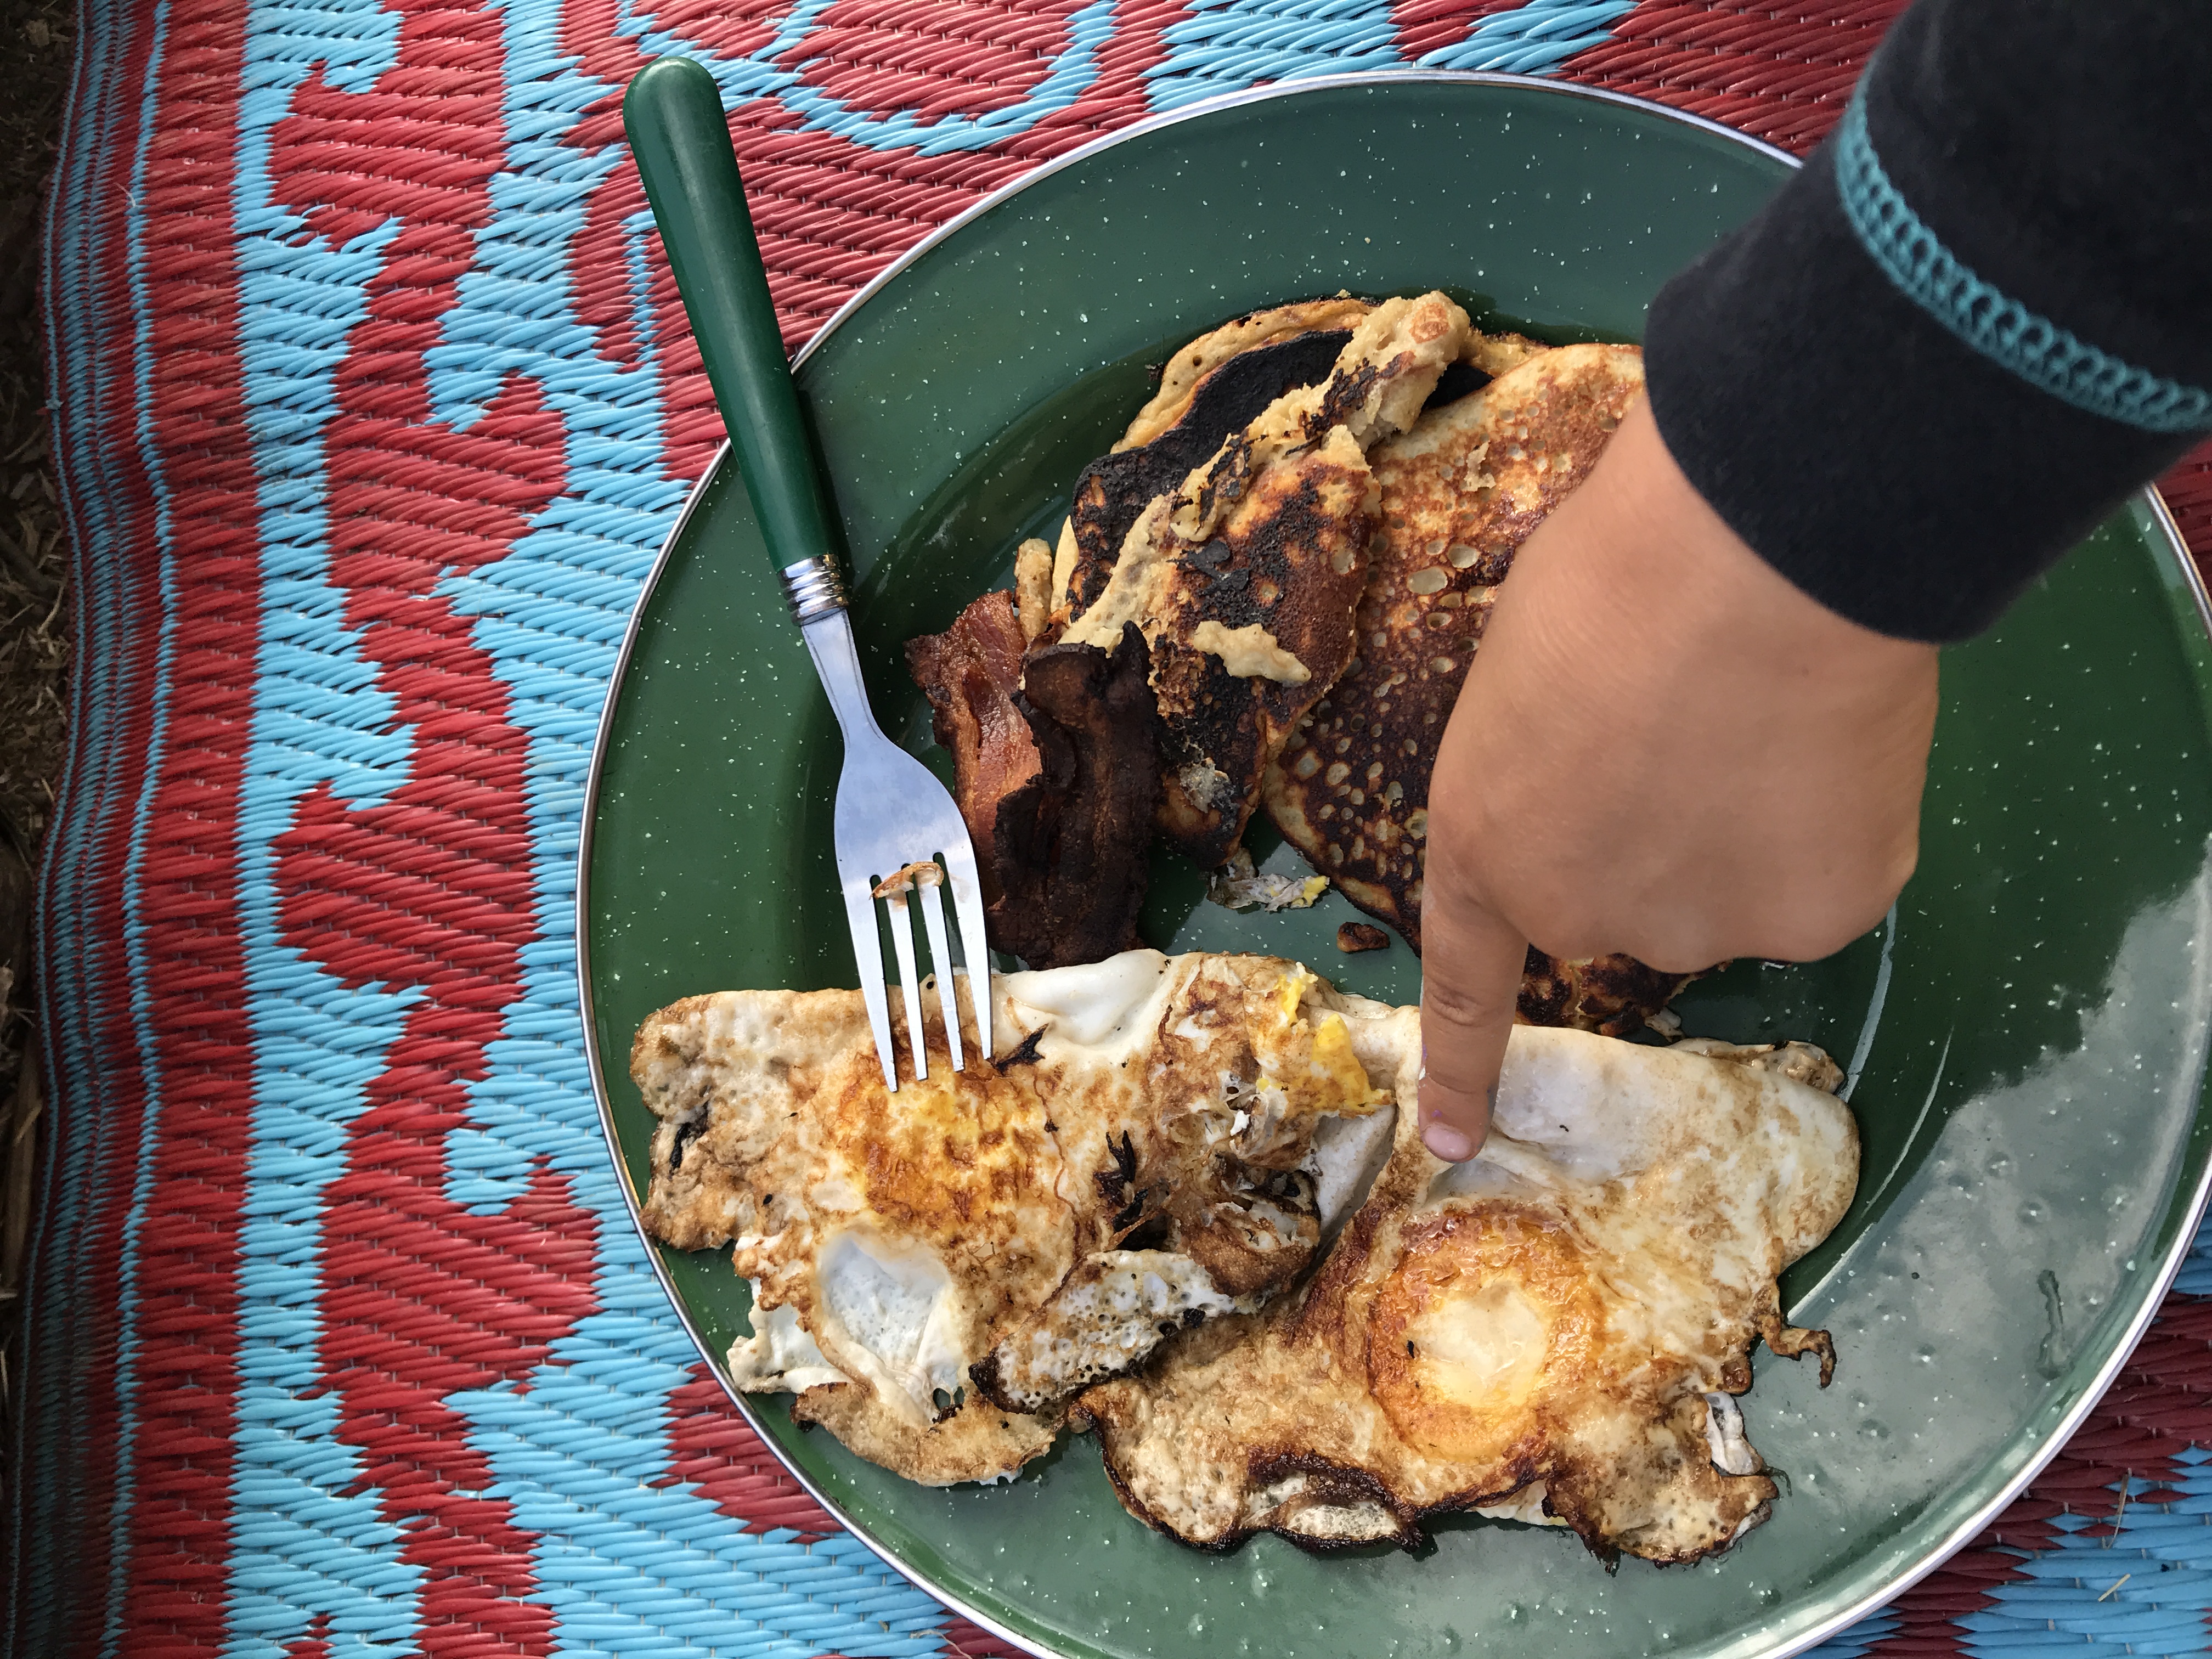
This past weekend, Matteo and I went on a camping trip, just the two of us. I had a couple of ripe bananas and I knew he was going to need sustained energy for our day outside. I measured out a 1/2 cup of the pancake mix and put it in a zip lock bag. I also brought 5 eggs. 1 for the pancake batter and 2 for each of us. Along with 3 slices of bacon. Like his mom, Matteo is a vegetarian who enjoys bacon. The food part of camping is one of my favorite parts of the whole experience. I love being able to make food outside and then eat it surrounded by nature. Once I book a campsite, all my thoughts go to what are we going to make and eat.
For breakfast it was obvious…Banana pancakes, bacon and eggs. Banana Pancakes Recipe
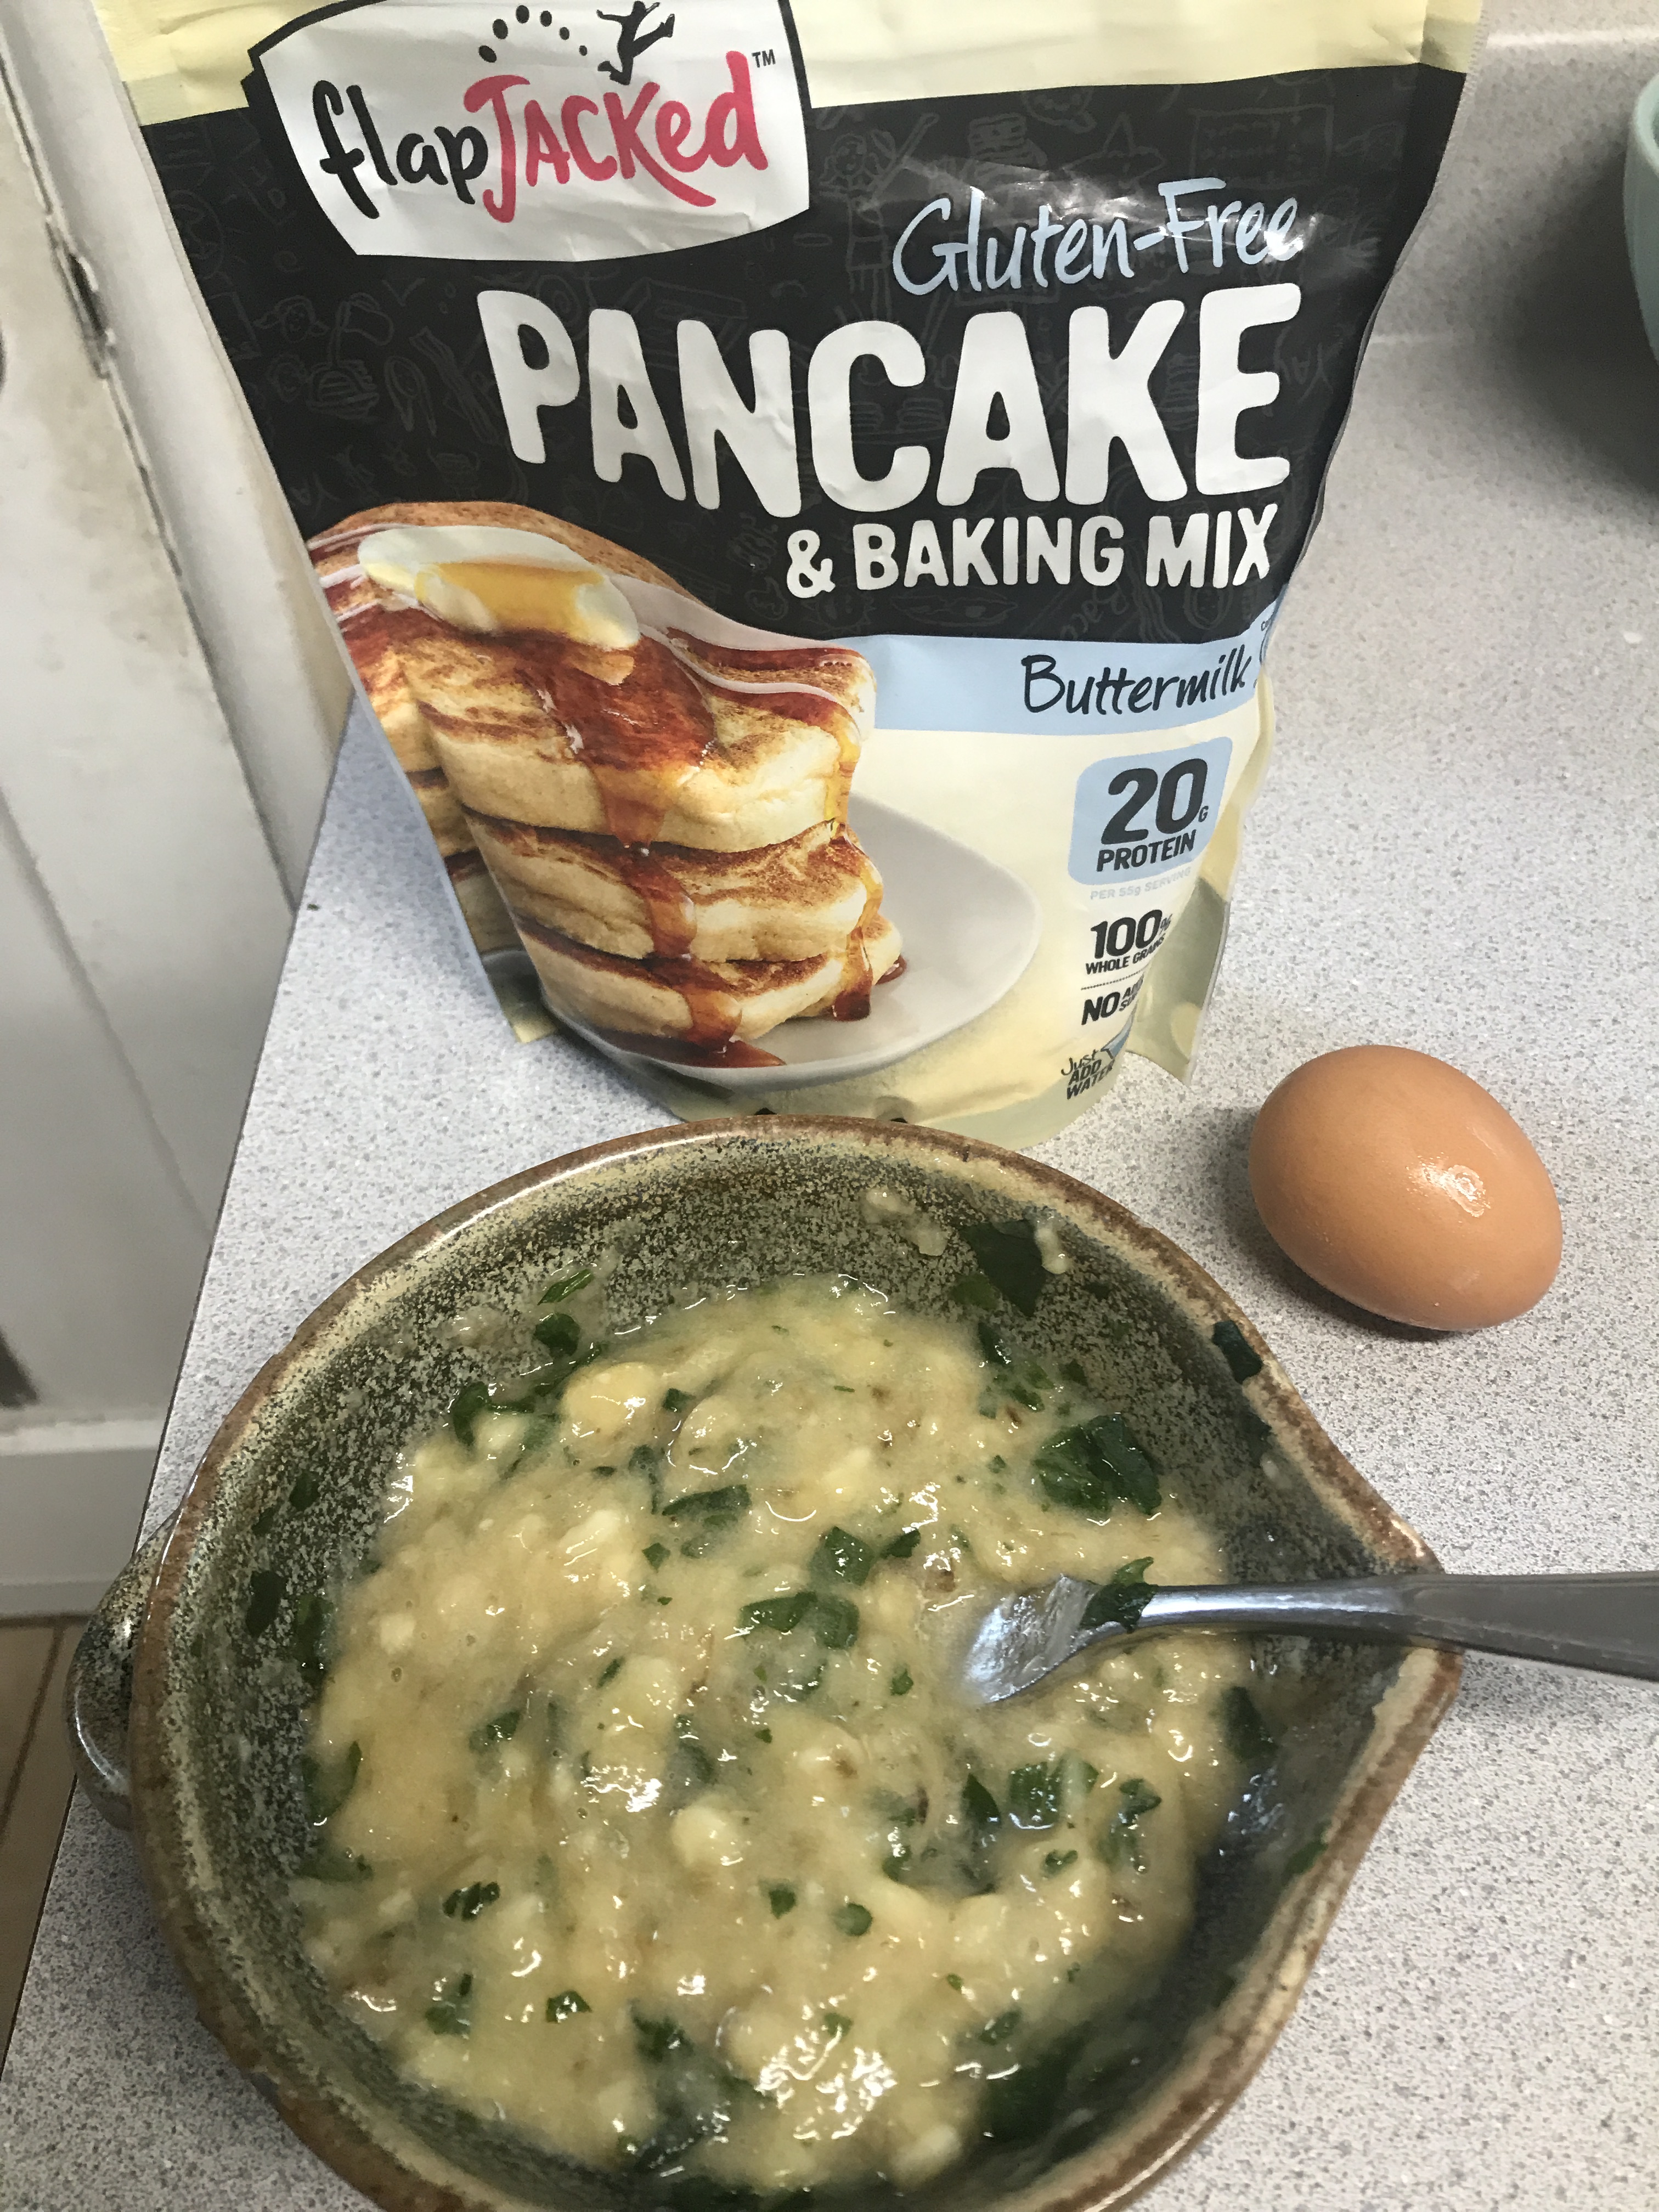
1/2 cup Flap Jacked gluten free pancake mix
2 ripe bananas
1 egg
1 handful frozen spinach
dash of vanilla (optional)
Directions:
Mash up bananas with a fork. Crush up a handful of frozen spinach (optional) and mix together. Sometimes I add a dash of vanilla.
Add 1/2 c flap jacked mix and one egg and mix until ingredients are combined.
Let sit for 5 minutes.
Add coconut oil to grill pan or skillet on medium heat
Pour in mixture making the size pancakes you desire. Flip when they start to bubble on top and the bottom slides easily.
Give them a try and let me know what you think. Enjoy!
We just returned home after driving 4,000 miles in 45 days covering the Pacific Northwest with our family of 4 living out of our Toyota Highlander.
The idea for the trip came from a dream Chelsea had last year when we were in Hawaii.
Last June, I took an extra month of paternity leave when Owen was about 4 months old and we exchanged homes with some friends that also had two little boys and live in Maui, Hawaii. One night, after putting the boys to bed, Chelsea and I were sitting out on the Lanai (deck) and she said, I’ve been dying all day to tell you about this dream I had last night.
In her dream, I had quit my job and we got in an RV and drove up the coast of California, through Oregon and into Washington. Her dream was very detailed even to the point of the storage bins that we used to organize our things.
That night, we had a long and inspiring conversation about it and agreed that next July I would quit my secure job that was paying our bills and we would borrow her parents RV and do the trip.
Because, why not? You only live once and our kids will only be young and not in school for a few more years. We knew it would be an amazing adventure that we would remember for the rest of our lives.
In addition to having an epic adventure with our family, our underlying purpose was to try and find a new place to live. We absolutely love where we live in Manhattan Beach, but it had become too expensive for us to live here. When you can’t afford to shop in the stores or eat in the restaurants in the town you live in, you need to either move or make more money. We’ve tried for a long time to make more money and that hasn’t happened, so maybe we should move.
Then we came home from Hawaii and the buzz about it wore off as we settled back into our lives. Some nights we would look on Zillow at different homes in various places around the country. Ultimately, we decided that we really do love where we live, so let’s just keep living here as long as we can. When the time is right for us to move, we will know it and move then.
Life continued and our trip got put on hold indefinitely. My sister in law Heather said, “why would you move from the community that you love so much just to save money”. We were like, yeah, that makes sense, we have always been taken care of here and our bills are paid, so let’s just stay. Yes it’s expensive, but it’s amazing and our life here is just too good to leave.
Well, as life happens, I was fired from my “secure” job a week before Christmas and a couple of months later, the pandemic happened.
One afternoon during the quarantine, we were on a family walk around the neighborhood and Chelsea said, “Remember the dream I had in Maui?” I said, “Of course”, she said, “let’s put it back on the table”. I said “Why not?! There is no better time than right now”.
After posting on Instagram that we were looking for someone to sublease our place, a friend of a friend decided to rent our place for the month of July. We took that as a sign to go for it.
We spent the next few weeks planning out our route. Normally we would have just planned for the first few days and been open to where we felt led. We are big on “going with the flow” However, because of the pandemic and so many places being closed, we planned out our trip in detail covering 28 of the 31 nights in July.
A combination of camping spots and hotels taking us all the way up to Portland and back. Visiting all of the various places along the way that friends had told us about. Places that we may want to someday live in, as well as visiting a few epic spots like the Redwoods and Crater Lake.
The original plan was to take an RV, but after talking to Chelsea’s mom, who has one, we decided not to take it. Way too much work if you’ve never driven one. Also, we wanted to be able to explore the various places we went to and felt like we wanted our car, because it would be much easier to get around in.
We then talked about pulling a trailer, but that proved to be too expensive and also hard to drive. We even tried to rent one from U-haul and you could only have it for 14 days, so that wasn’t going to work. We looked into adding roof racks, but that turned out to not be an option as well. Eventually we settled on packing the car with what we needed and just using a soft sided roof top carrier for all of our camping stuff.
Downscaling from an RV to a Toyota Highlander with a roof top carrier wouldn’t have been a big deal with just the two of us, but with a four year old and a one year old, it’s a little bigger of deal as you can imagine.
What was it going to be like, the 4 of us in a confined space (tent, car or hotel room) all day every day for 4 straight weeks. We had just spent the last few months in quarantine together and still liked each other, so we were confident/hopeful we could do it.
What was it going to be like in the outside world with covid 19 and protests and places potentially being shut down. They had just announced they were going to close the beach where we live for the 4th of July weekend. What if they closed a campsite we had reserved or what if they made everyone quarantine at home again and we couldn’t go back home, because someone else was staying there…
Well, we were about to find out.
On July 1st, we put all of our camping stuff in the roof top carrier and all of our clothes and other essentials organized neatly by Chelsea, in different sized bins in the trunk and hit the road.
My sister in law Krystal is one of the best “home chefs” that I know and she came up with this turkey burger recipe and shared it with us when she was visiting last year and we have been making them every single week since.
My wife Chelsea has been mostly vegetarian her whole life until she became pregnant with Matteo 5 years ago. She had always said she would listen to her body if she ever got pregnant and follow whatever cravings she had. We began to add protein into our diets. Turkey meat seemed to be the best option for us and so we would have it once a week and try it in different forms, Meatloaf, Shepards Pie, Lettuce Cups and of course the most obvious choice for ground turkey… burgers. We rarely had them though because they always came out dry and bland and we had to load them up with sauces.
Well, not these, Chelsea loves them. Matteo (4), who has a very refined palate for someone his age loves them and even our 1 year old Owen loves them. I have tried so many different variations of a turkey burger in my quest to eat healthy delicious food and most of them end up being dry and tasteless. However, these are unlike any I’ve had before. They are full of flavor, moist and delicious.
I cooked these for my men’s retreat back in March. We cook them whenever we have friends over and this past weekend, we went up to Big Bear and stayed with some friends and made them and they asked for the recipe.
There is a lot to the recipe, which makes them so good. So when my friend Tyler reached out to me asking for it I decided I would share it on my blog so anyone can have access to it and try it out for themselves.
The secret to them is the unique flavor. The curry and apple go so well together that I want to experiment with that combination in other dishes. If you come up with anything good, let me know.
What you will need… 1 pound Turkey meat 93% Lean. I get the organic one from Trader Joes 1 Apple 1 small or 1/2 onion 1 slice gluten free bread. (Chelsea is gluten free) 1 egg 1 tsp Curry Powder 1 tsp Garlic Powder 1 tsp Salt
Directions Toast bread and dice onion and cook it in butter or olive oil until lightly browned. Dice up the apple and toast into small pieces. While the onions are cooling, mix turkey meat and spices together. Add onions, bread, apple and egg to the mixture and form into patties. Then cook until done on a grill, skillet, or grill pan like below. I find that this amount makes 8 good size burgers or 14 sliders. We recently had some non gluten free Hawaiian rolls and the sliders worked perfectly.
We hardly ever have them with buns because they are so good by themselves. Sometimes they go over a salad or sometimes just on it’s own with either Sweet Potato Fries or wedge cut Gold Potatoes and either Asparagus or Green Beans for the veggie.
We love these potatoes too and they are crispy on the outside and soft on the inside when you do this secret trick I read about… Cut them and soak them in water for at least 30 minutes. Then let them dry before adding the oil and spices. We coat ours in avocado oil because it has a higher cooking temperature than olive oil. For spices, we absolutely love the Trader Joe’s Everything But the Bagel Seasoning and also add some Rosemary and Thyme from our garden.
Bake at 400 for about 30 minutes turning once or if you really want the best result, 425 for 15 minutes and then turn it down to 375 for 15 minutes.
Here they are pairing with a Fennel, Arugula, Orange Salad and Carrot, Ginger soup
I’d love to hear what you think of these and what you ended up pairing them with. Enjoy friends…
Our whole family loves curry. Which is interesting because I never had it growing up. My mom and grandmother were pretty traditional “Southern” cooks. So everything had lots of butter and was very protein and carb focused. I ate this way or my own variation of it until I found the yoga path. Then I began to focus more on the vegetables and less on the meat and carbs. Chelsea and I have been making curry since we first met 10 years ago. She had just moved here from Hawaii and had this cookbook from a Vegan chef named Todd and we have used his recipe as a base all these years. It is the one thing we have consistently eaten every week or two since we’ve been together. Now both our boys, Matteo (4) and Owen (1) eat and love it too.
Many cultures and traditions have a variation of curry, but not really America. So when I introduced my parents to it, they hadn’t had anything like it before. We traveled a lot as a family growing up, so we sampled a lot of different delicacies from our travels. However, most of our trips were within the United States, Canada, Mexico and Europe. Fun fact, I have been to every state except Alaska and Montana. Although there are many options for curry in North America, when we would travel we usually ate at the places known for having a good steak or maybe ribs and I didn’t see curry on too many of those menus. Even though I’ve been to nearly every country in Europe, I haven’t really heard of a German curry or an English curry or even an Italian curry. I’ve found that most people (myself included) don’t travel outside of their culinary comfort zones.
Nowadays I sample different curries whenever I have the chance. I love curries from Thailand, India, Africa and Japan, but the one I make at home is almost always the same, because it is so consistently delicious and everyone I have served it to seems to love it. So I call it the Love Curry. According to Chef Todd’s recipe it’s an Indian vegetable curry.
The reason I call it the Love Curry, is that whenever we have a friend or a family that we know that is going through a challenging time, we make a big batch and eat some our selves and give some to the family in need. A lot of times its a family who just had a baby, but this last time it was a family who had someone in the hospital for a few weeks and he was just coming home. So Chelsea offered to make them dinner. As soon as she told me I said, let’s make curry!
It’s easy to make, it just takes a lot of prep, which I love. When I’m chopping the vegetables, I think about who I’m making it for, even if it’s just Chelsea and the boys and I put love into it. Now that may sound strange to some of you and it would have to me back in the day, but as I’ve found a love for cooking and talked to some of the most amazing chefs and watched chefs on cooking shows, I hear it all the time. The best chefs in the world talk about putting love into their food. I truly believe you can taste the difference between food that was made with love, versus food that wasn’t.
I wanted to share the recipe here so anyone who knows someone or a family in need or maybe a nurse or single mom, could make them some Love curry and enjoy some themselves. Or maybe you just want to show some love to your self or your own family. Either way, here is the recipe.
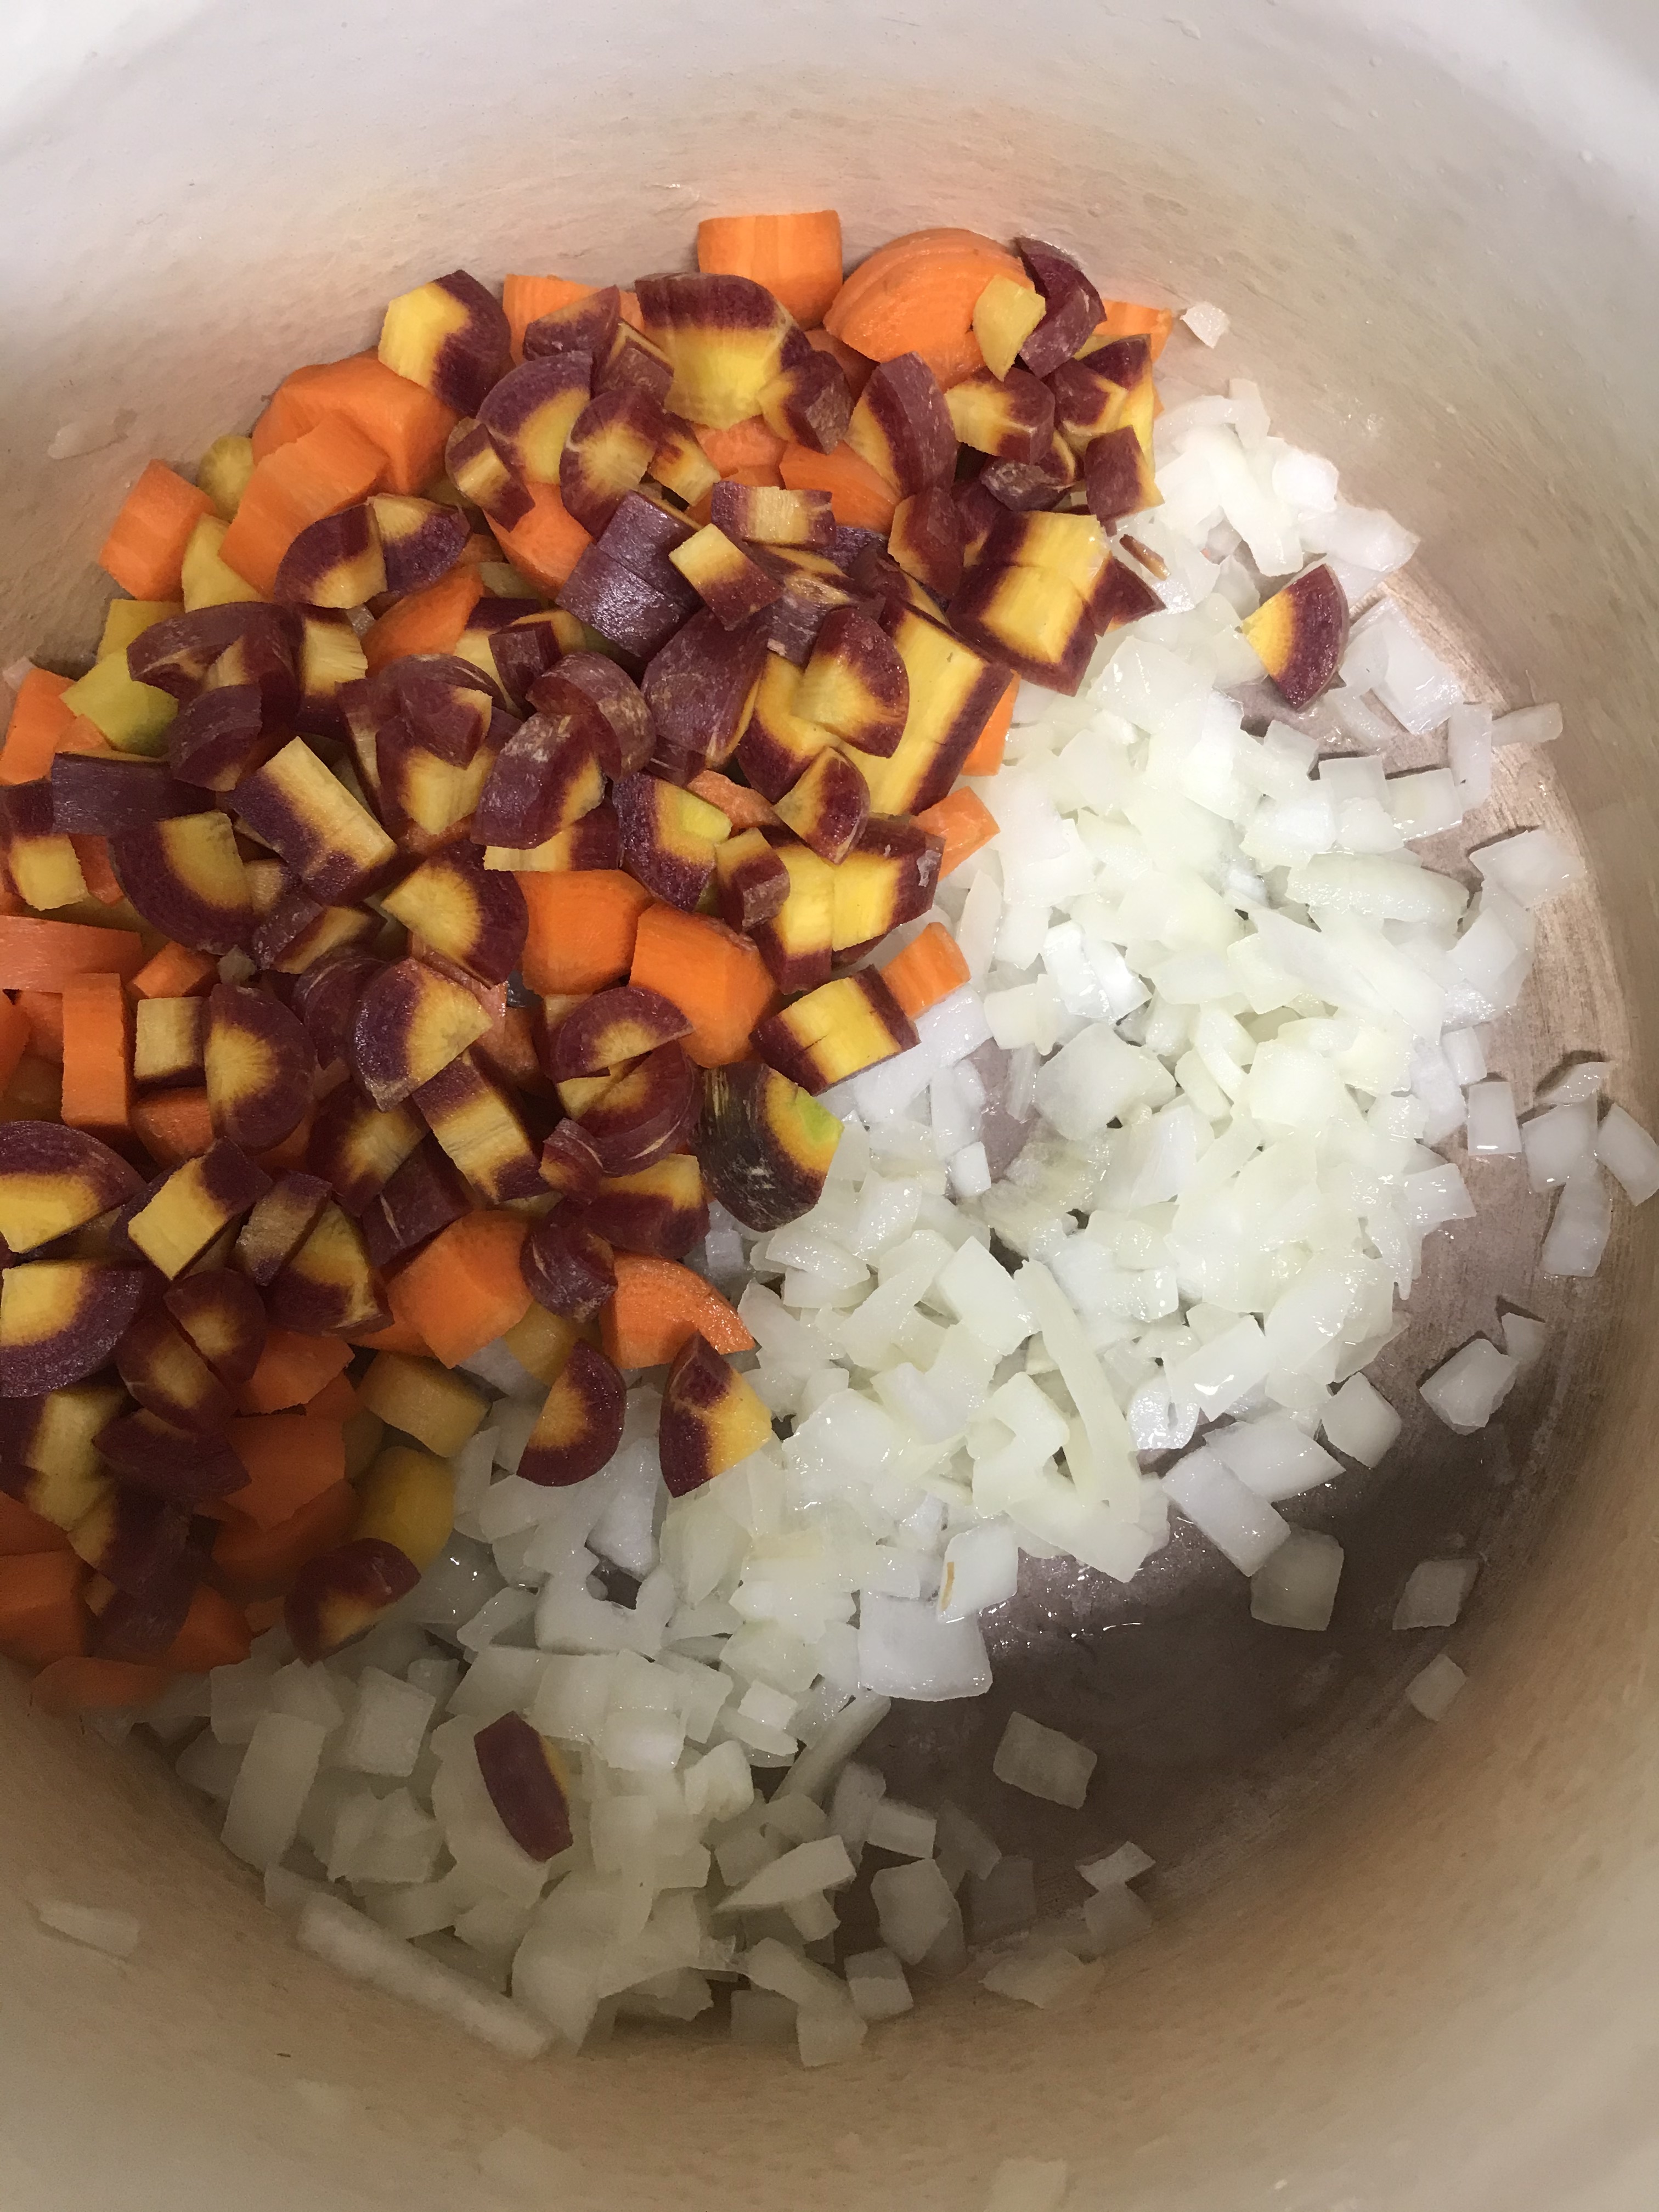
I usually make a lot of it, so I would cook it in a Dutch oven or the biggest pot you have. I prep all the vegetables first, because I think it makes it easier when putting it all together.
You will need Coconut oil, coconut milk, salt, curry powder, turmeric, ginger, onion, carrots, sweet potato, potato, butternut squash, cauliflower, green beans, peas and cashews.
First, heat the coconut oil in the pot and add the onions, then the carrots.
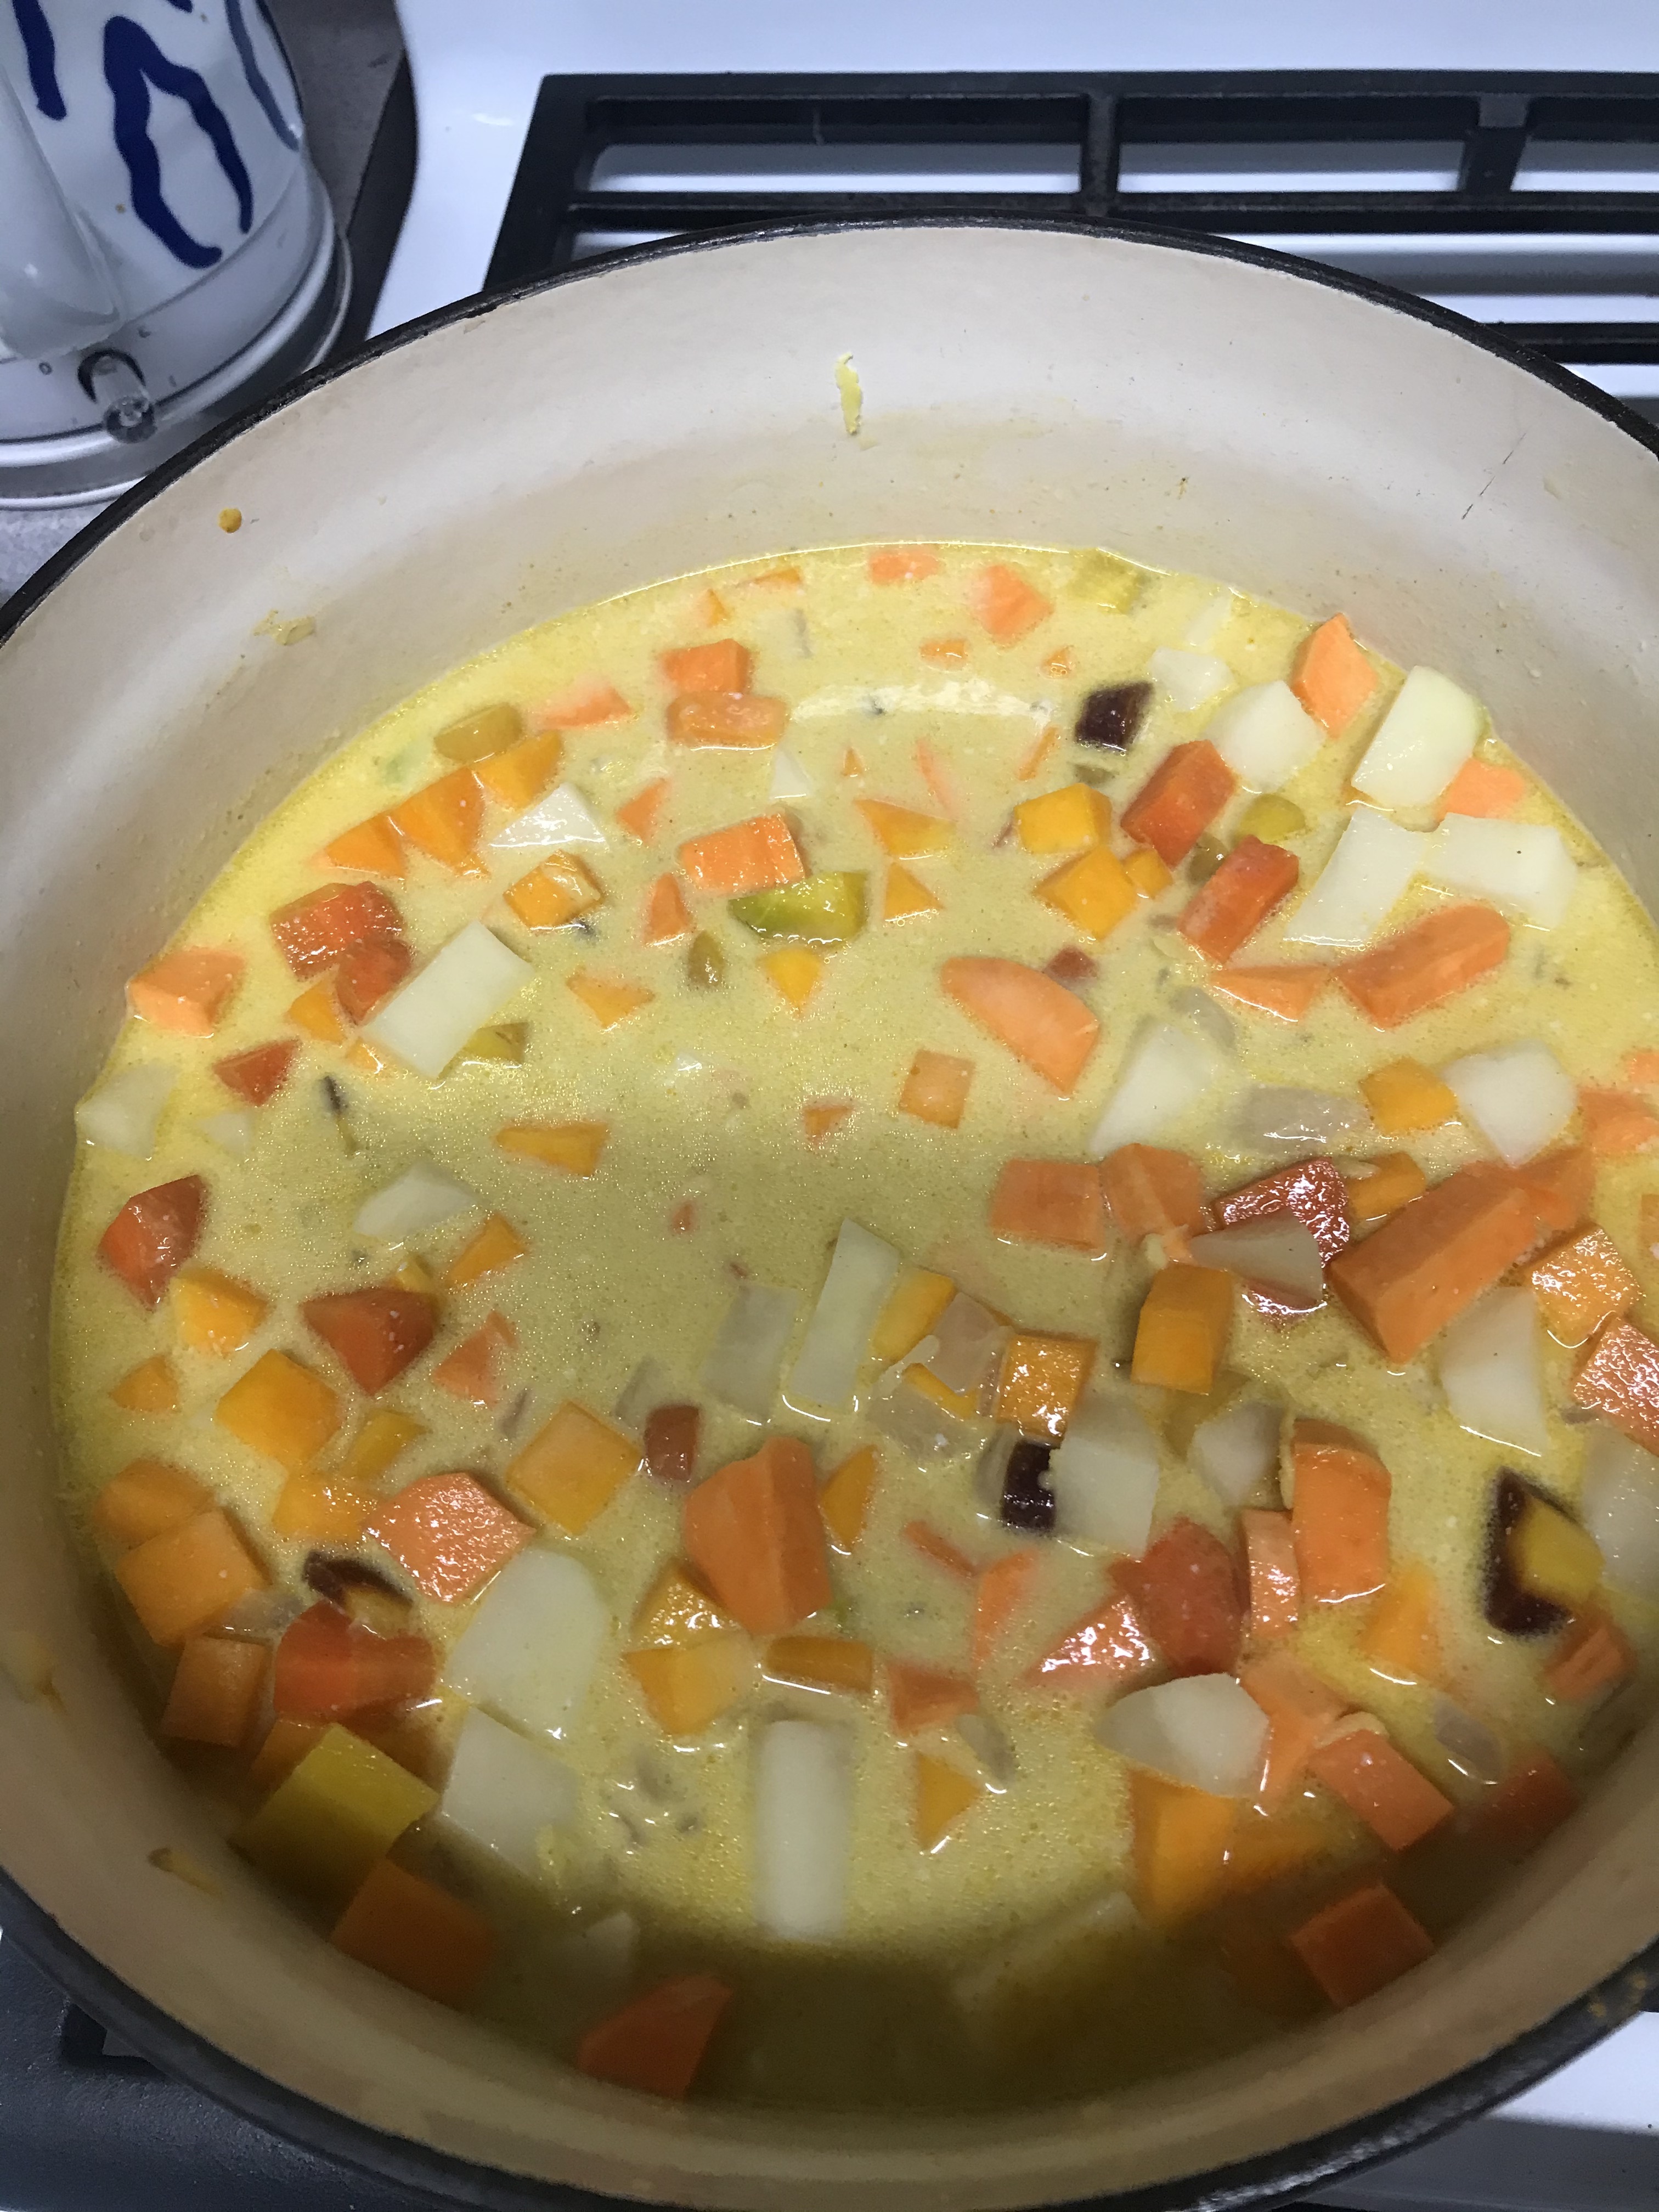
Then add the potatoes, sweet potatoes, butternut squash, and grate the ginger.
Next, add the coconut milk and spices including salt. Cover and cook these vegetables for about 20 minutes until soft.
Finally add the cauliflower, peas and green beans and let it all simmer together. 45 minutes is ideal, but it can be done in 30. The longer the better in our opinion, so all the flavors can meld together. At the very end, right before I serve it I add cashews. This gives it a perfect little crunch.
So you’re getting 7 or 8 vegetables and it’s healthy, filling and delicious. We have it over either quinoa or basmati rice. It’s also great the next day as leftovers.
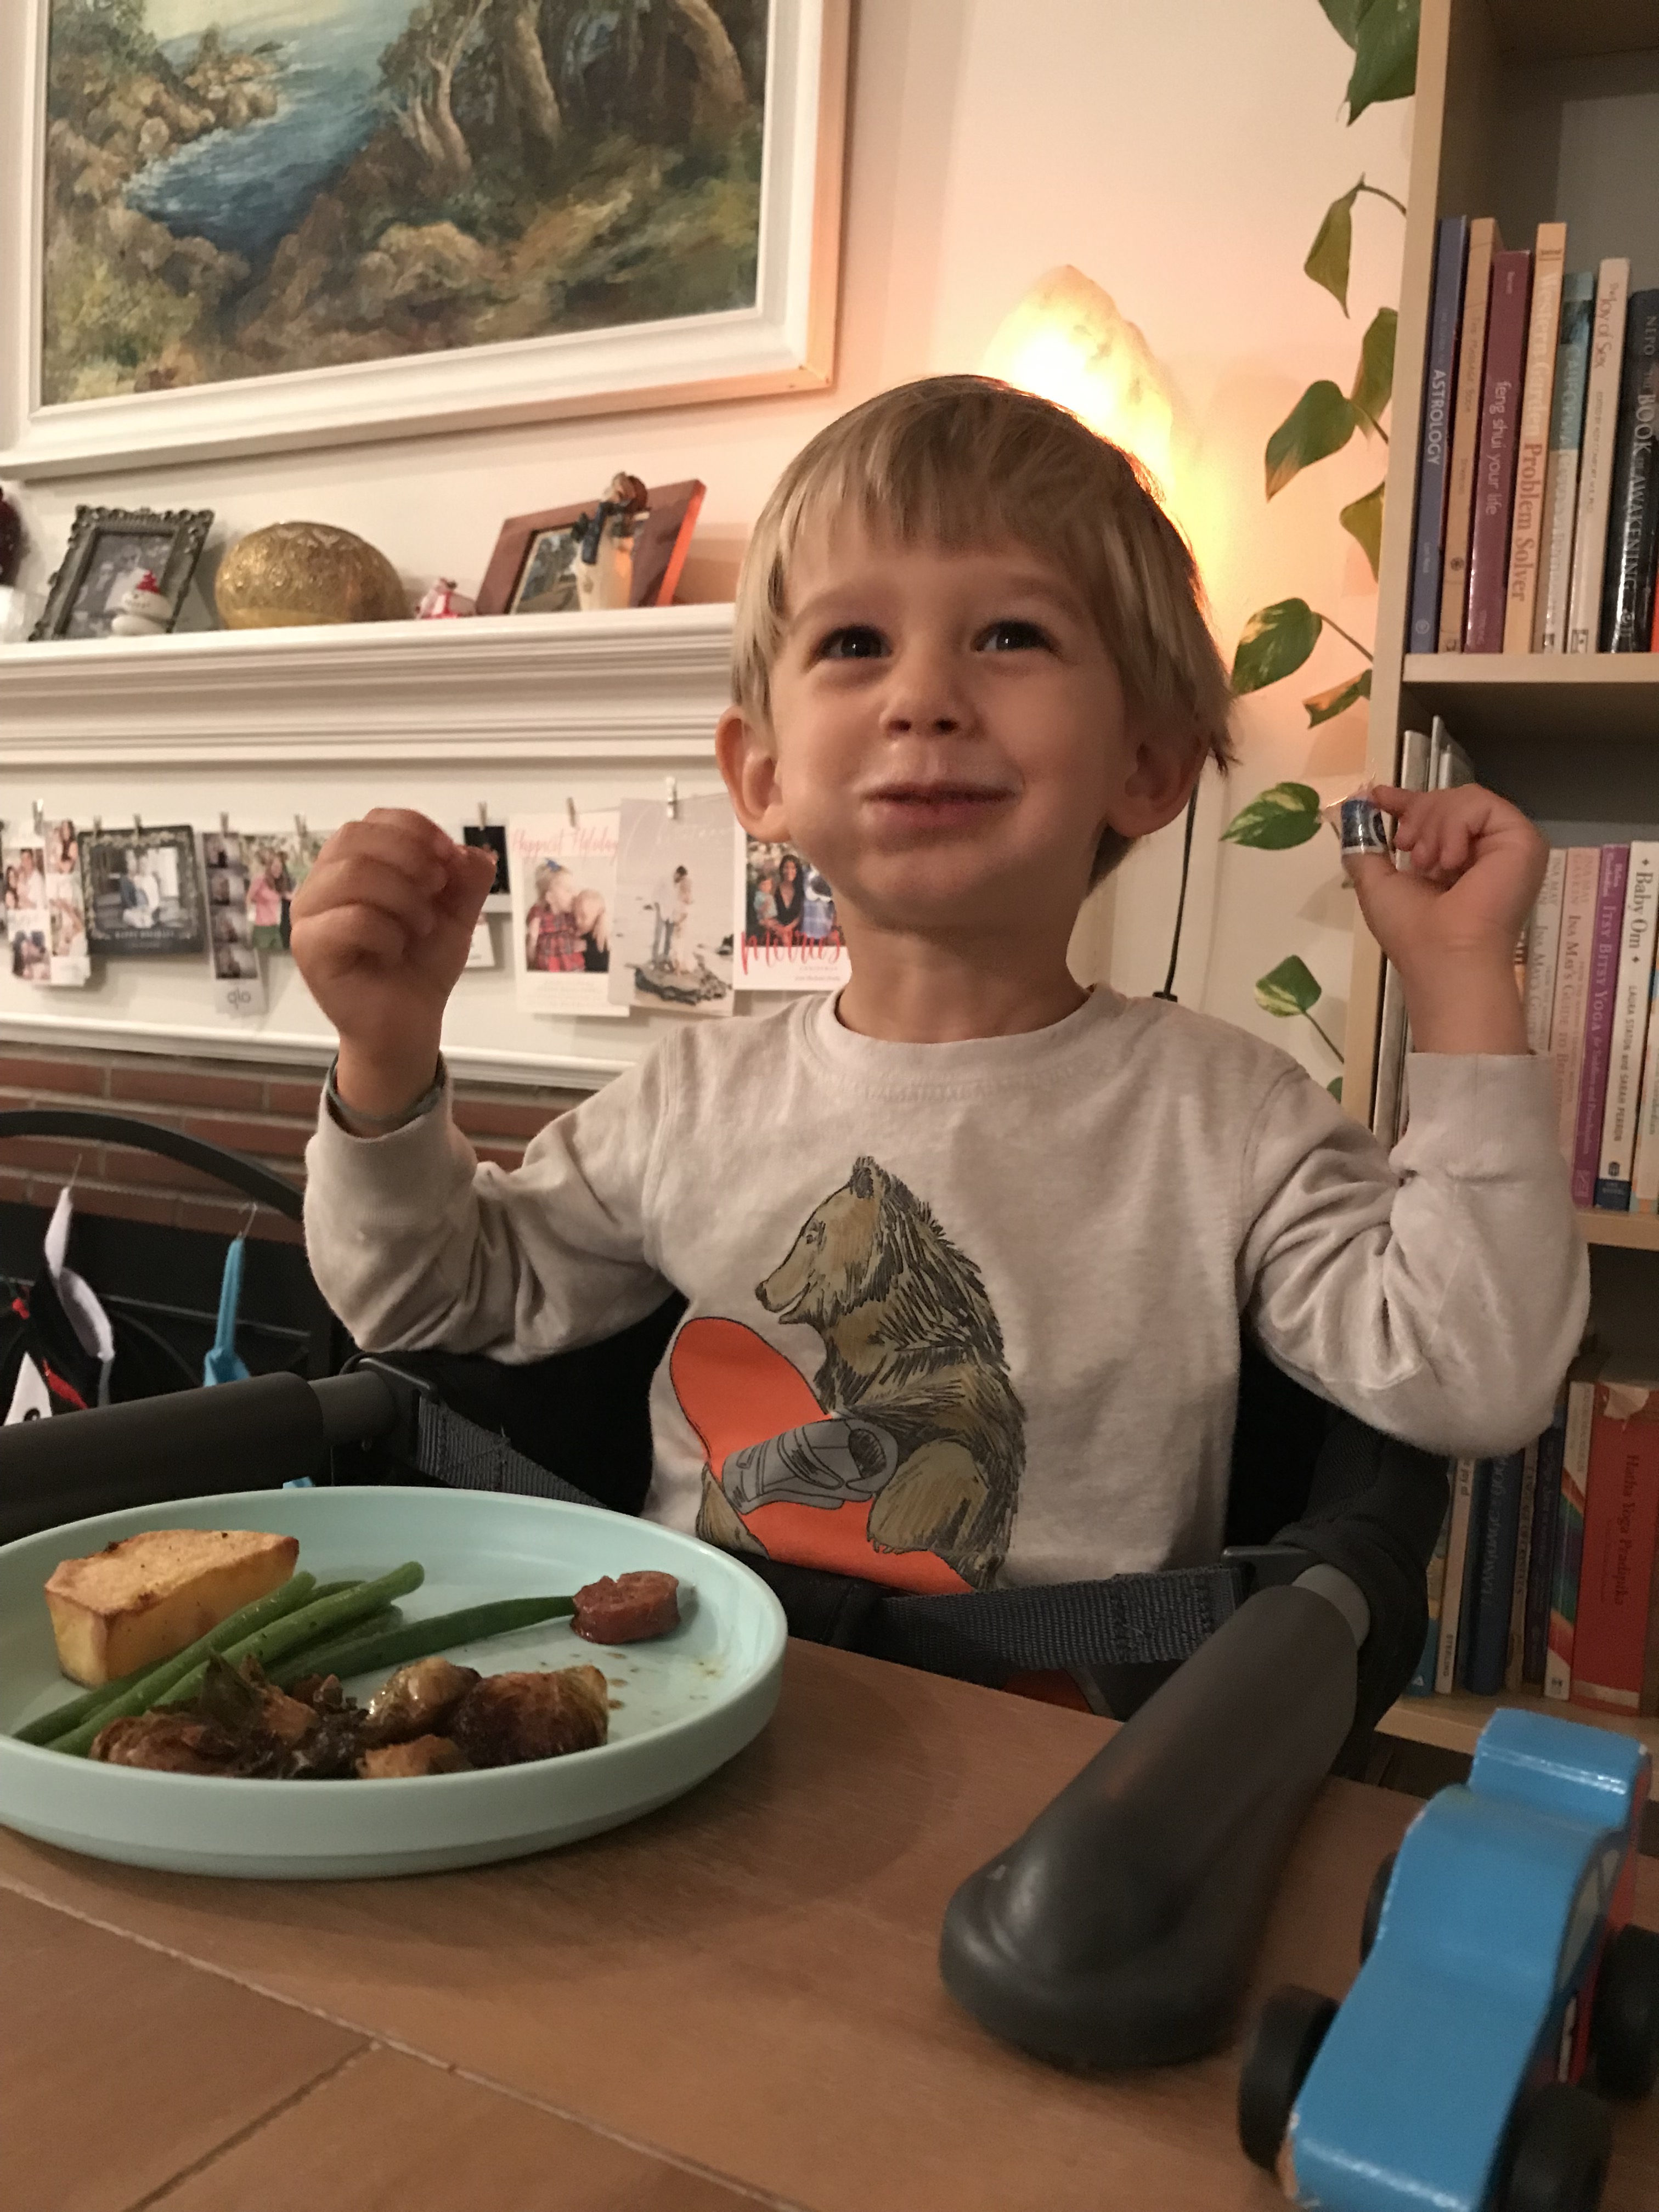
Tuesday night is Dad’s night. Chelsea teaches a prenatal yoga class and doesn’t get home until after I’ve put Matteo to bed. So once she leaves for class, it’s Dad’s night. After walking around the neighborhood looking at all the Holiday lights, we came home and cooked dinner together.
I love food and cooking and I want my son to appreciate it too. I have made it a point through his life so far (2 years 9 months) to expose him to all aspects of food. From growing and buying it to cooking and eating it. My hope is that he will understand how eating a healthy well balanced diet can positively impact his life. This method has worked pretty well so far as he is an adventurous eater, who loves fruits and vegetables. Tonight he ate green beans, roasted potatoes, chicken and brussels sprouts.
When he eats a protein, I say, “this will make you strong”. When he eats a vegetable, I say, “this will keep you happy and healthy”, when he eats fruit I say, “this will give you energy”. The carbs are never a problem for most kids. Getting young kids to eat rice, pasta or bread doesn’t really seem to be an issue for most parents. It’s the vegetables that are the most important for mental and physical development, but also the most challenging to get kids and even some adults to eat.
Matteo and Aven checking out the broccoli for bugs
Involving Matteo in the growing, harvesting and cooking of vegetables has really helped cultivate his love of vegetables and food in general.
Back to the brussels. They have been a chef/foodie thing for the last several years as it seems like just about every restaurant I go to has their own riff on this vegetable that when I was a kid, no one really ate.
I make it a point to order them as a side whenever they are offered. They are all a little different and I kind of like them all. My ideal brussels sprout side dish has a crunch from a toasted nut, a sweetness from a grape or berry and then the charred crispy vegetable, all of this married together with a sweet and tangy sauce.
Trying to perfect my homemade brussels sprouts to combine my favorite aspects of all those that I’ve had out and about has been a labor of love for the last several years. I’ve tested out different ways to cook them. From complex: steaming, pan frying and baking, to simple: baking at high heat. I feel like the other night I had a major breakthrough and wanted to share it with anyone else who enjoys these mini cabbages as much as I do.
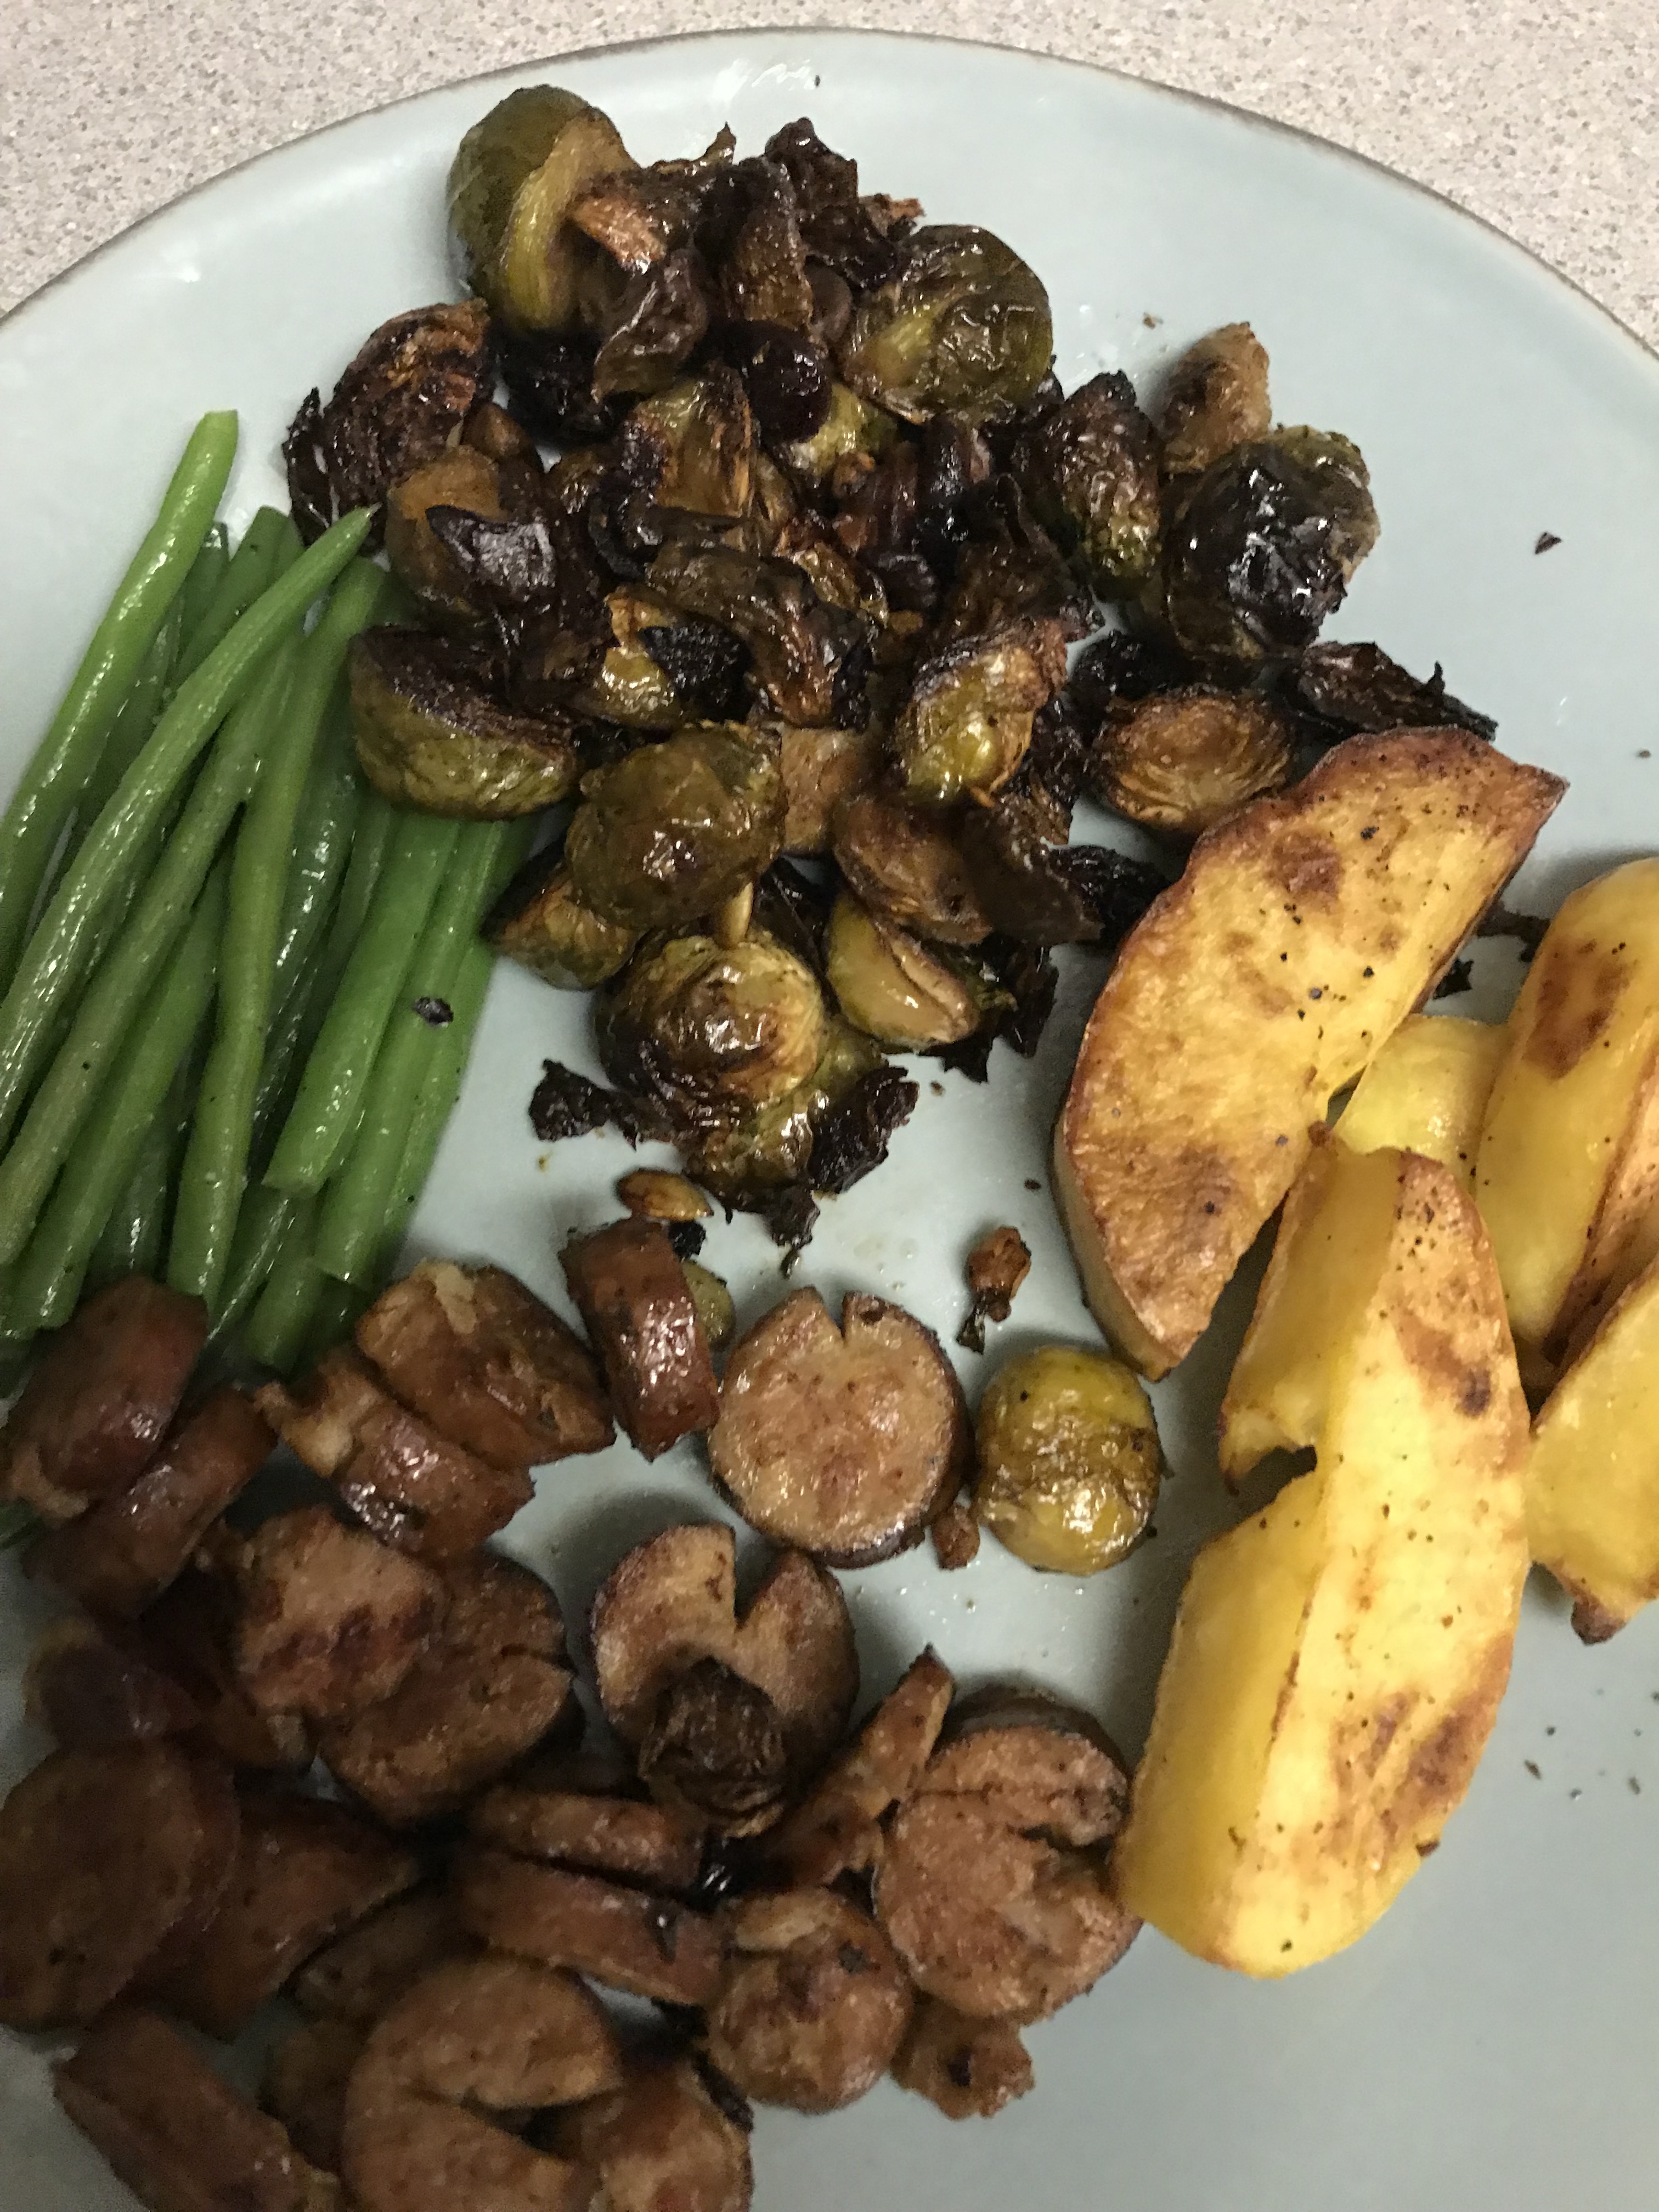
First, I cranked the oven to 425 and prepped the brussels by trimming the ends, cutting them in half and rinsing them in the colander. Then I tossed them in olive oil with some salt and pepper and placed them flat side down on the baking sheet.
Brussels and Potatoes
I also cut potatoes into 1/2″ wedges and tossed them in olive oil with salt and pepper as well and put them on the same sheet. After 20 minutes, I flipped the potatoes and tossed the brussels around. Lately I have been adding chopped walnuts and cut up grapes, but since I didn’t have any, I added some of trader joes omega mix, which has dried cranberries, walnuts and pumpkin seeds and that turned out great.
After 10 more minutes, about 30 minutes total (checking because ovens vary) I took out the brussels and put them in a bowl. Then, I added honey and balsamic vinegar to the bowl and tossed everything together. I shook the potatoes around and placed them back in the oven for a few more minutes until they were crispy on the outside and soft in the middle.
In the past, I added balsamic vinegar and sugar while pan frying, but most of the time, while they would be tasty, they would be a little bit soggy. I found adding the honey and balsamic in the end is the way to go. They get absorbed into the brussels while they are hot. Finally I had something that was “blog worthy” because it was delicious AND super easy to make…
I steamed the green beans and then tossed with a little butter, salt and pepper. For the chicken sausages I cut them into little circles and pan fried them according to the package directions with a little olive oil. If you’re not into chicken sausages, I also make the same dish with salmon and it goes really well.
Matteo and I both enjoyed our dinner and ate everything on our plate. I came out from putting him to bed and Chelsea had come home and devoured her plate that we left for her and she said “that was awesome, I really loved it” and she doesn’t just throw out compliments. If she is saying it’s legit, then it truly is. It was an easy dinner to make and I got everything Organic from Trader Joes. Try it for yourself and let me know what you think.
Recipe for Brussels Sprouts
Brussels sprouts, olive oil, kosher salt
3 tablespoons balsamic vinegar
2 teaspoons honey
1/4 cup crunched up walnuts
1/4 cup grapes sliced in quarters
Heat oven to 425°F. Meanwhile, trim the bottoms from the sprouts and cut each one in half through the stem. Add olive oil and salt and pepper and toss to coat. Arrange them cut-side down on a rimmed baking sheet and place in oven.
Roast, for 15-20 minutes, then add walnuts and grapes or TJ’s omega mix and continue to roast until the leaves are dark brown and crisp and the undersides of the sprouts are browned, 25 to 30 minutes total. Take them out and put in a bowl and drizzle with the balsamic vinegar and honey and toss to coat. Serve immediately. Yum.
Home Grown
Organic Baked Thai Curry Chicken Dinner with Coconut Rice and Veggies
Dinner was ready in 35 minutes with very little prep.
While my wife Chelsea and I cook and eat healthy and what I think are delicious meals on most nights, we’ve grown tired of the same old recipes. So tonight we decided to try something totally different and it was such a success and so easy to make that I decided to write my first blog post in nearly 3 years because I wanted to share it.
For my vegetarian friends, you can try it with tofu. We are going to do that next week and I will let you know how that turns out.
We already had some red Thai chili paste, fresh ginger and garlic, cilantro from our garden and a couple of cans of light coconut milk. I stopped by Whole Foods and picked up some organic chicken breasts on my way home from work.
Over the last two years of our son Matteo eating solid food, we have made a conscious effort to involve him in the meal preparation process. Everything from shopping or growing the food, to prepping and cooking it. I know it has made a huge impact on his eating habits. He is a very healthy eater and will try just about anything we make. He doesn’t necessarily like everything, but he will at least try it.
Veggies (We did broccoli) I’ll try cauliflower next time
Directions for baking chicken
Preheat oven to 350 degrees
Place chicken breasts in a baking dish seasoning with salt and pepper
In a blender or I used a magic bullet, combine remaining ingredients (coconut milk, curry paste, ginger, garlic cloves and cilantro)
Puree until smooth
Pour over chicken (Matteo did this part)
Bake for 30 minutes in oven
Turn on broiler and broil for 5-7 minutes until crispy and a little charred on top
While chicken is cooking, rinse one cup of rice and add to a pot with a 14oz can of light coconut milk. Cook rice until done. One cup of rice with one can of coconut milk is the perfect amount of liquid to make delicious tasting rice. I learned this from my brother when we were on a family trip to Hawaii a couple of years ago and it has been my favorite way to enjoy basmati rice ever since.
We steamed broccoli, because it’s easy and we all love it. We grow broccoli in our garden. I think this is why Matteo likes it so much. He helps us plant and water it and then harvest it when it’s grown and I’m sure this helps him appreciate it even more. Next time I do this dish, I will probably also add cauliflower and maybe zucchini.
When everything was cooked, we put the rice in a large bowl, added the chicken and broccoli and then poured some of the cooked mixture over everything. We blessed our food with love and gratitude an thanked the chickens that gave their lives for us to enjoy a yummy dinner. It was delicious and we ate it all up.
Let me know what you think. I’d love to hear your feedback.